How to Add Closed Captions and Subtitles to Canvas Online Course Videos
Online course videos hosted on Canvas need to include closed captions and subtitles to make the content accessible. Learn more on our blog.

Canvas is a cloud-based, open-source online learning platform. It’s used by schools, colleges, and companies to deliver educational material and training courses. Many of these online courses include video. If you want course participants to get more from the material, it’s essential to include closed captions and subtitles in your Canvas videos.
Why Should You Use Subtitles or Closed Captions in Canvas?
One key reason to use subtitles or closed captions in Canvas is to improve accessibility. This is necessary, as around 20% of the US population has a disability according to the U.S. Census Bureau.
1. It’s required by law.
However, it’s also a legal requirement. Under the American Disabilities Act (ADA) it’s essential to make accommodations for people with disabilities.
Canvas closed captioning can do this by describing exactly what’s happening on the screen, including the dialog. This ensures that all students know what’s happening, whether or not they have a disability.
Adding Canvas closed captioning means that students who have hearing impairments won’t be disadvantaged. The World Health Organization estimates that 466 million people worldwide have hearing loss. That’s why it’s important to account for this when creating course content. Closed captions also help students dealing with behavioral or cognitive disorders.
2. For non-English viewers
In addition to ADA compliance, using subtitles in Canvas also supports students whose native language is different from the video language. According to Babbel, there are around 1.5 billion English speakers in the world. But only a quarter of those speak it as their native language.
When you’re watching a video that’s not in your native language, it can be hard to completely grasp what’s happening. Using foreign subtitles can make course content clearer.
In fact, it’s useful to offer subtitles for multiple languages. That lets those speaking English as a second language see video subtitles in their own language. In turn, that improves their understanding and retention of the course material.
3. It enhances the learning experience.
Adding closed captions and subtitles to your Canvas videos improves the learning experience.
This improves student satisfaction, making it easier to recruit more participants for your online course.
How to Get Closed Captions and Subtitle Files for Canvas
Here’s how you can get Canvas HTML5 video captions and subtitles to enhance your videos:
1. Prepare your video file
The first step is to have a video file ready. You might already have your video in Canvas. If you’re making a new video, record it via your webcam and edit with your chosen video software.
2. Upload your video file to Rev
Upload your video to a closed captions and foreign subtitles service like Rev.
Try Professional Captions for Canvas Videos
3. Receive your caption file
Depending on the video length and services selected, you could have your caption files within 24 hours.
4. Add the caption file to your video in Canvas
You’re ready to upload the generated subtitles file to Canvas. Canvas accepts subtitles in both standard SRT format and WebVTT format for iOS devices. You can download both from our captions editor.
How to Add Your Caption or Subtitle File to a Canvas Video
Once you’re in your Canvas account, it’s easy to add captions or subtitles to your video.
First, go to the page where you uploaded your video. Enlarge the video window to see the caption and subtitle options.

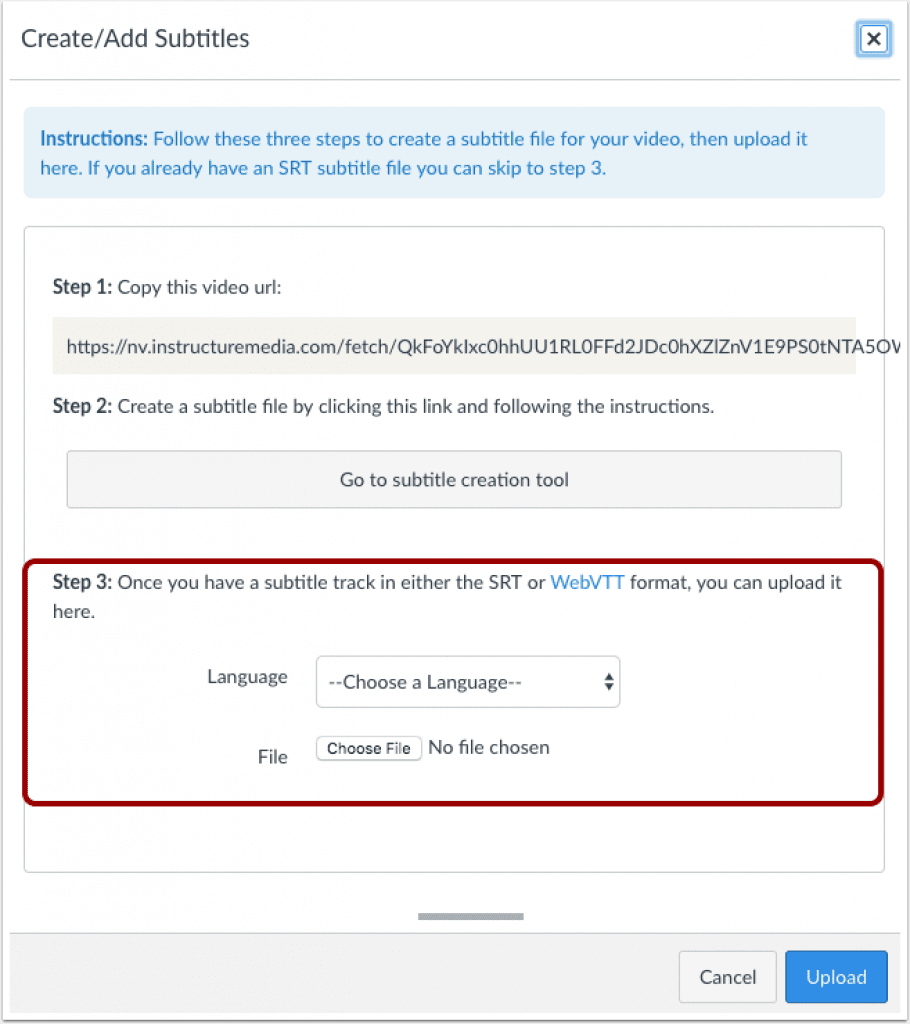
Hover over the Closed Captions icon at the bottom of the video window. This will bring up the Upload subtitles dialog box. Click on it. You’ll see a box titled Create/Add Subtitles.
This outlines a three-step process, but you can ignore the first two steps, as you already have a subtitle file.

Choose the language your subtitle file is in the Language drop-down menu. Just below, click on Choose file to locate your subtitle file on your computer.

Once you’ve found the file, click on it, then click the Open button on your computer’s dialog box. Return to Canvas and click Upload to add the subtitle file to your video. You’ll get a confirmation message.
How to View Closed Captions in Canvas
By default, subtitles and closed captions are turned off on Canvas videos. If you want to see them, here’s what you need to do:
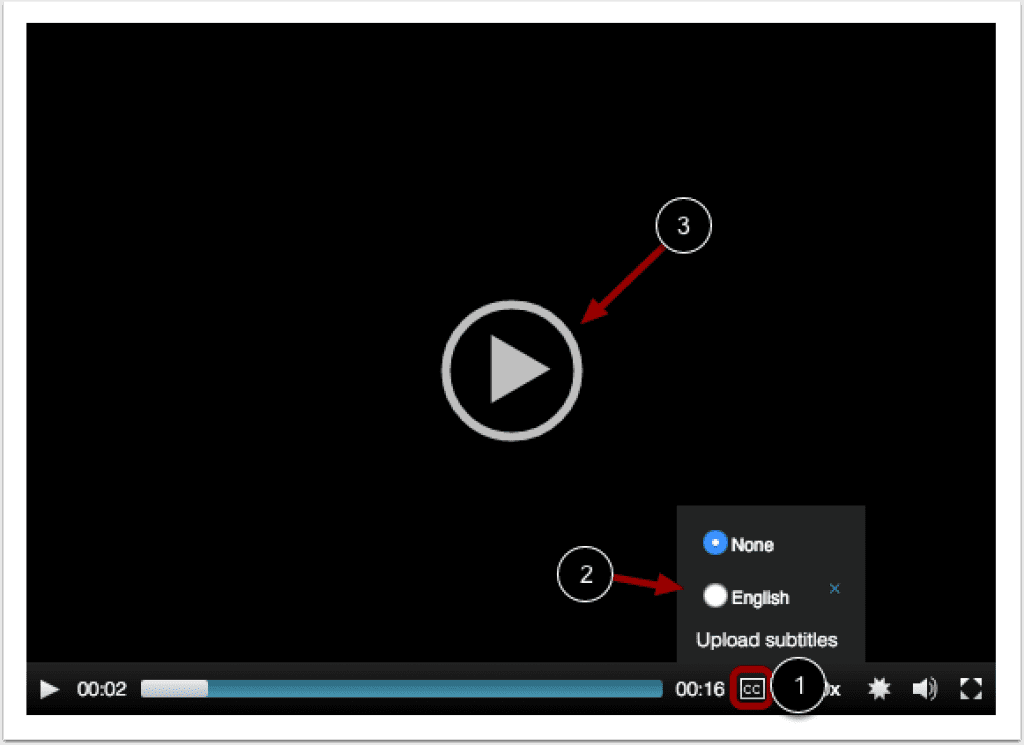
Open a video you want to view the closed captions for. Hover over the closed caption icon [CC]. This will show a list of available subtitles.
Click the radio button next to the chosen subtitle language to load the subtitles. Then press the Play button.

To turn subtitles off, hover over the closed captions icon. When you see the popup menu, select the radio button next to None to turn subtitles off. Then press the Play button to play the video without subtitles.
Adding closed captions and subtitles to your Canvas videos makes it easier for anyone to benefit from your course content, regardless of ability or the language they speak. And there’s one more benefit to captioning your videos: because subtitle files are text, they make useful transcripts of your course content, which is great for SEO.
Heading
Heading 1
Heading 2
Heading 3
Heading 4
Heading 5
Heading 6
Lorem ipsum dolor sit amet, consectetur adipiscing elit, sed do eiusmod tempor incididunt ut labore et dolore magna aliqua. Ut enim ad minim veniam, quis nostrud exercitation ullamco laboris nisi ut aliquip ex ea commodo consequat. Duis aute irure dolor in reprehenderit in voluptate velit esse cillum dolore eu fugiat nulla pariatur.
Block quote
Ordered list
- Item 1
- Item 2
- Item 3
Unordered list
- Item A
- Item B
- Item C
Bold text
Emphasis
Superscript
Subscript

Subscribe to The Rev Blog
Sign up to get Rev content delivered straight to your inbox.


