
How to Edit iPhone Videos for Audience Engagement
iPhone video editing is simple with built-in tools or third-party apps. Learn how to make professional-quality videos for your brand.
These days, everyone with an iPhone virtually has a studio camera in their pocket. For content creators, this also means they have a powerful tool for building audience engagement on hand at all times.
Using your phone to share video content doesn’t require expensive studio editing software, either. With a combination of the iPhone’s native Photos app, iMovie, and other third-party apps, it’s possible to edit iPhone videos into pristine shape for YouTube, Instagram, TikTok, and more. In this post, we’ll cover the basics of how to edit videos on your iPhone so you can connect with your audience just as you envision.
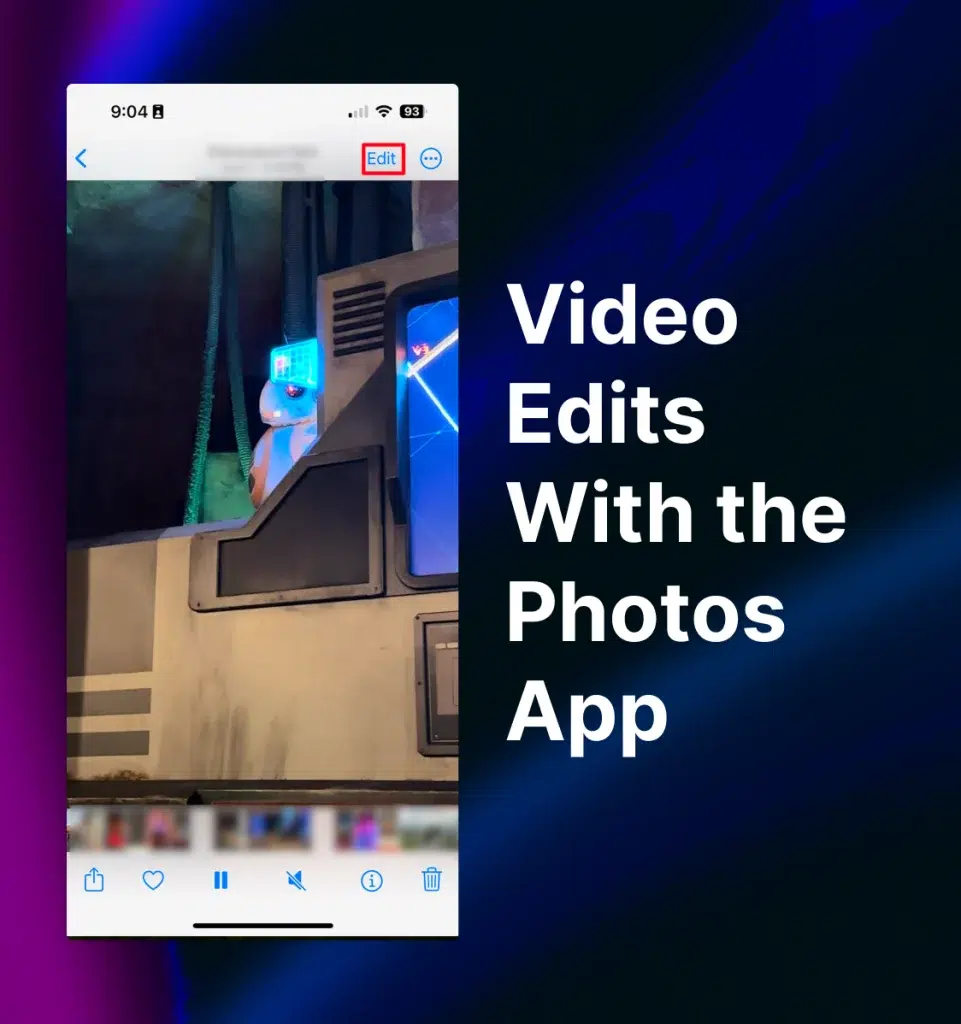
Make Basic Video Edits With the Photos App
You don’t have to download expensive apps to start editing videos on your iPhone. The native Photos app is a basic iOS video editor that has quite a few great built-in tools to get you started.
You can edit videos for free, right out of the box, by selecting any video in the app and then tapping “Edit” in the top right corner. From there, you’ll see four editing options at the bottom of the screen, which you can use to make the following adjustments.
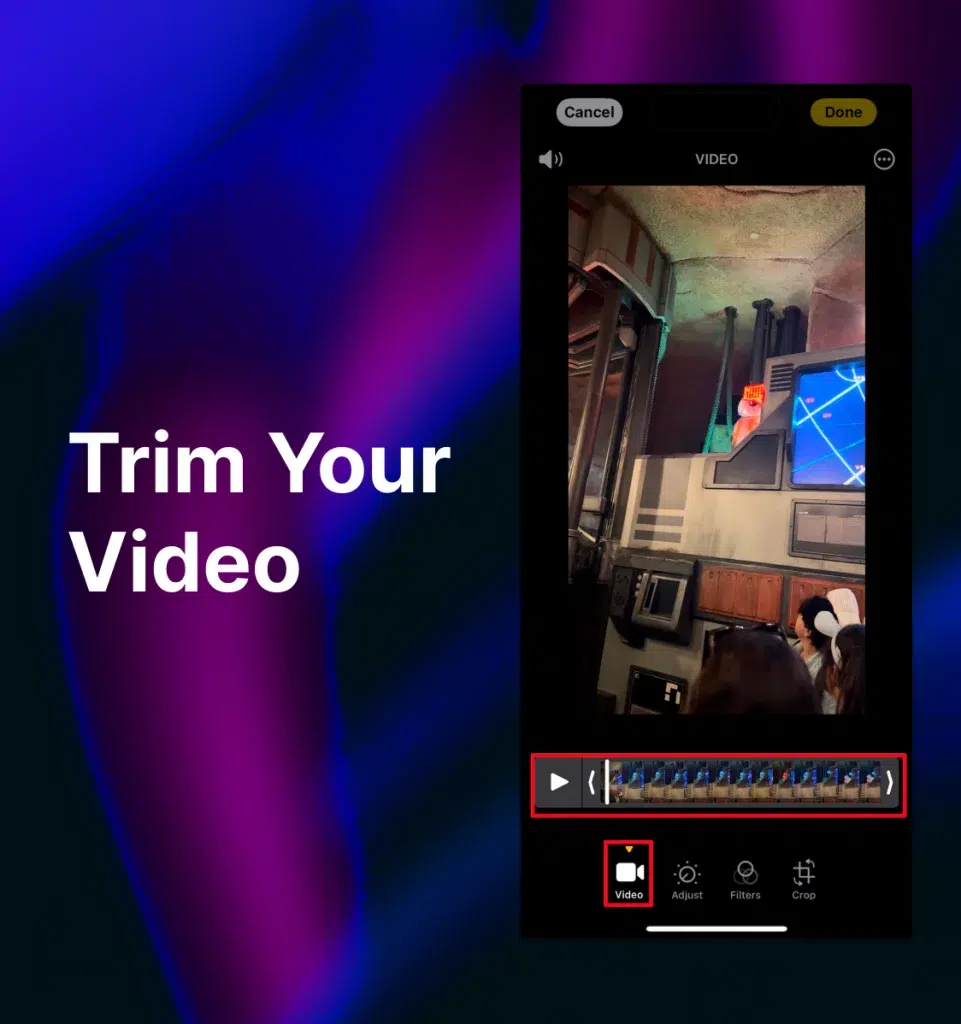
1. Trim Your Video
No one wants those extras you accidentally captured at the end of your video before you cut the recording. If you’re wondering how to shorten a video on an iPhone, you’re at the right step.
Once you tap “Edit” the first option for “Video” will automatically be selected at the bottom of the screen. There, you’ll see a slider you can use to trim the beginning or end of the video. Simply tap and hold on the left or right arrows and move the slider to where you’d like the video to start or end.
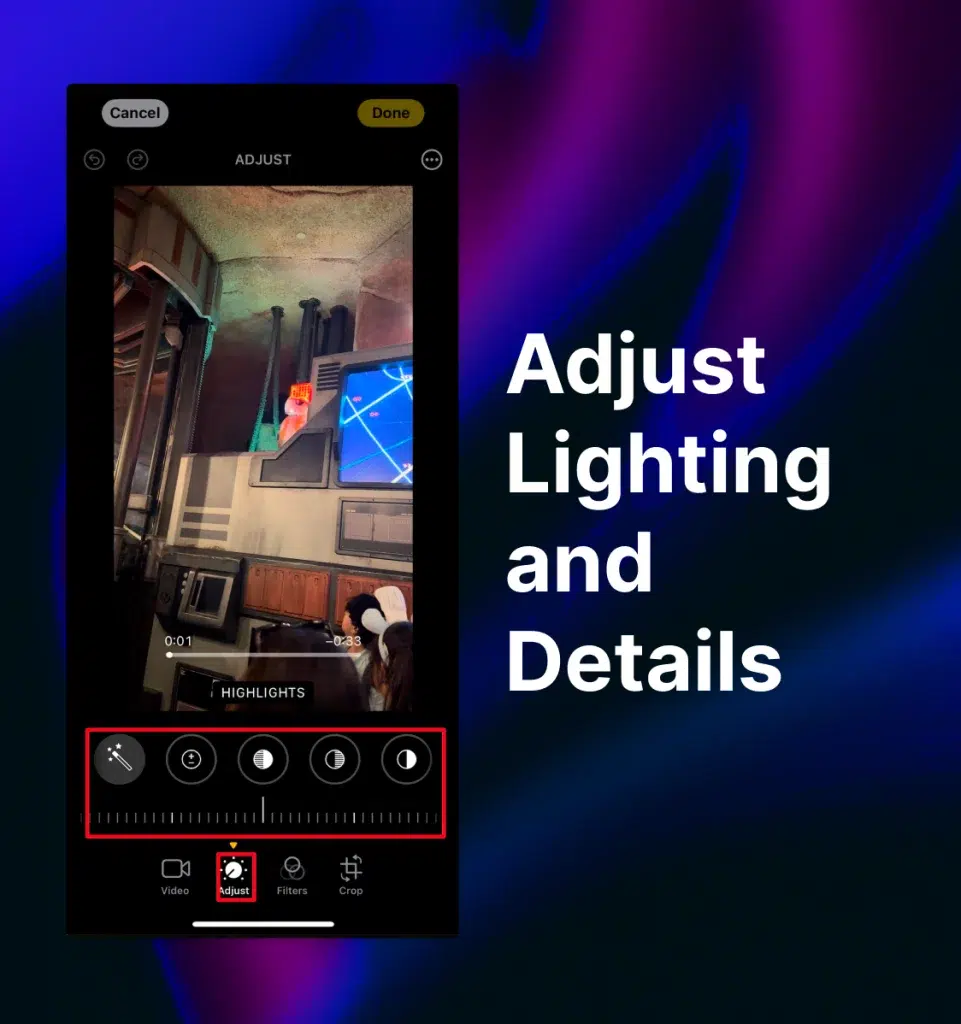
2. Adjust Lighting and Details
After you’ve trimmed your video to the correct length, tap the “Adjust” option under the video slider, and you’ll see a new set of tools appear.
There are several options here, including adjusters for exposure, highlights, shadows, brightness, saturation, sharpness, and noise reduction. When you tap each option, a slider will appear underneath it — simply slide left or right to make changes and polish the look of your video so it’s publish-ready.
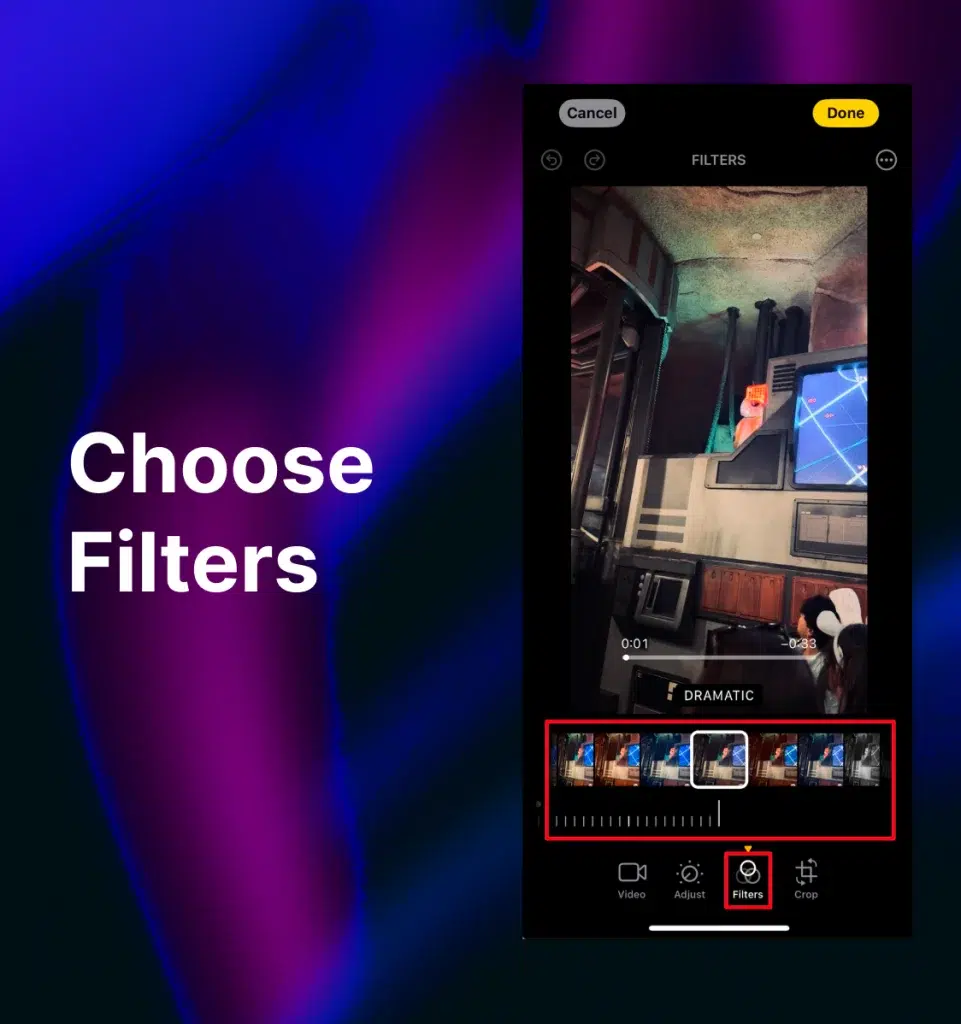
3. Choose Filters
Next, you can edit the overall look and feel of your iPhone video with filters. Filter adjustments can help you create a consistent style or “vibe” for your brand, regardless of lighting variations across different filming environments.
To explore filter options, tap the “Filters” button at the bottom of the screen, then scroll through the various options underneath the video. You can choose from styles like “Vivid,” “Dramatic,” “Mono,” and “Noir.”
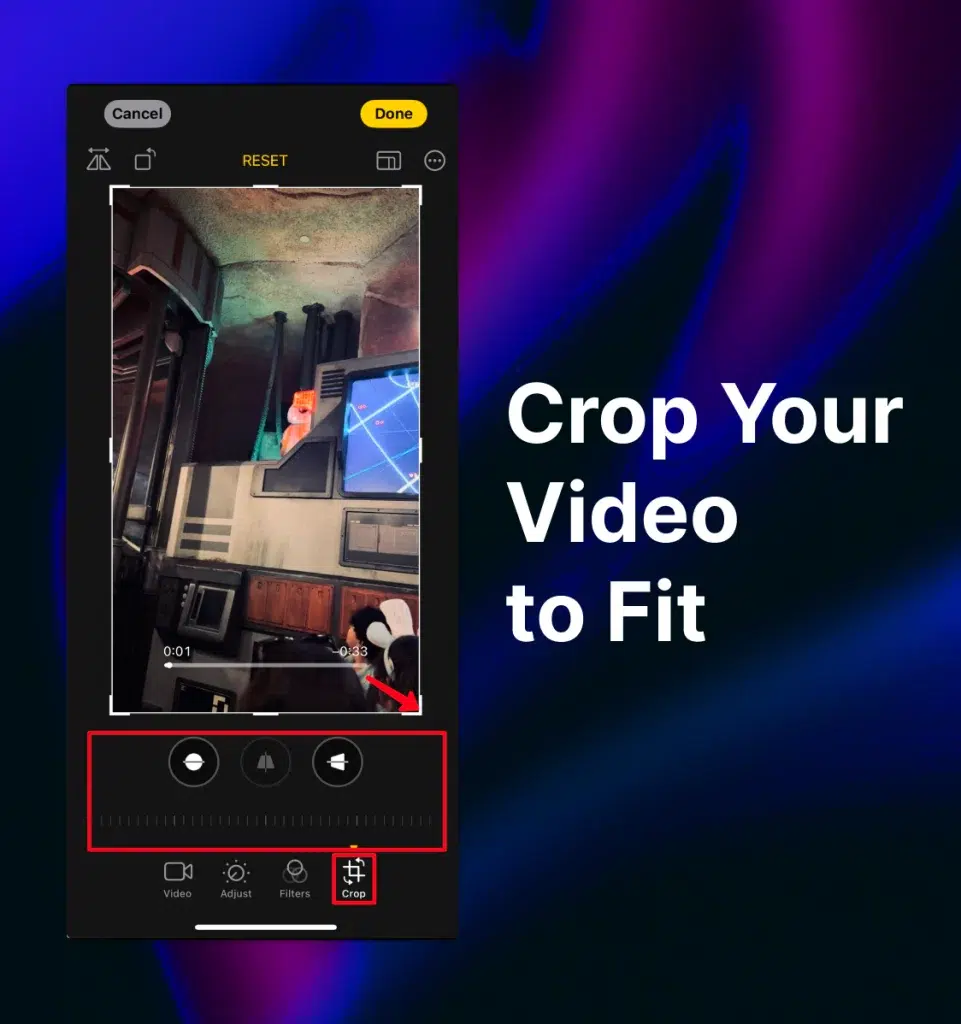
4. Crop Your Video to Fit
When sharing your video across multiple social media outlets, you may need to adjust the size and framing of your shot to fit different platforms. For instance, YouTube is usually best suited for 16:9 or 4:3 aspect ratios, while TikTok videos should be in 9:16.
To change video size on your iPhone, tap the “Crop” button at the bottom right of the screen. From there, you can select a few types of cropping and make edits by tapping and holding the bars on the sides or corners of the video and moving your finger to adjust the view.
Once you’re finished, tap “Done” at the top right of the screen to save your changes.
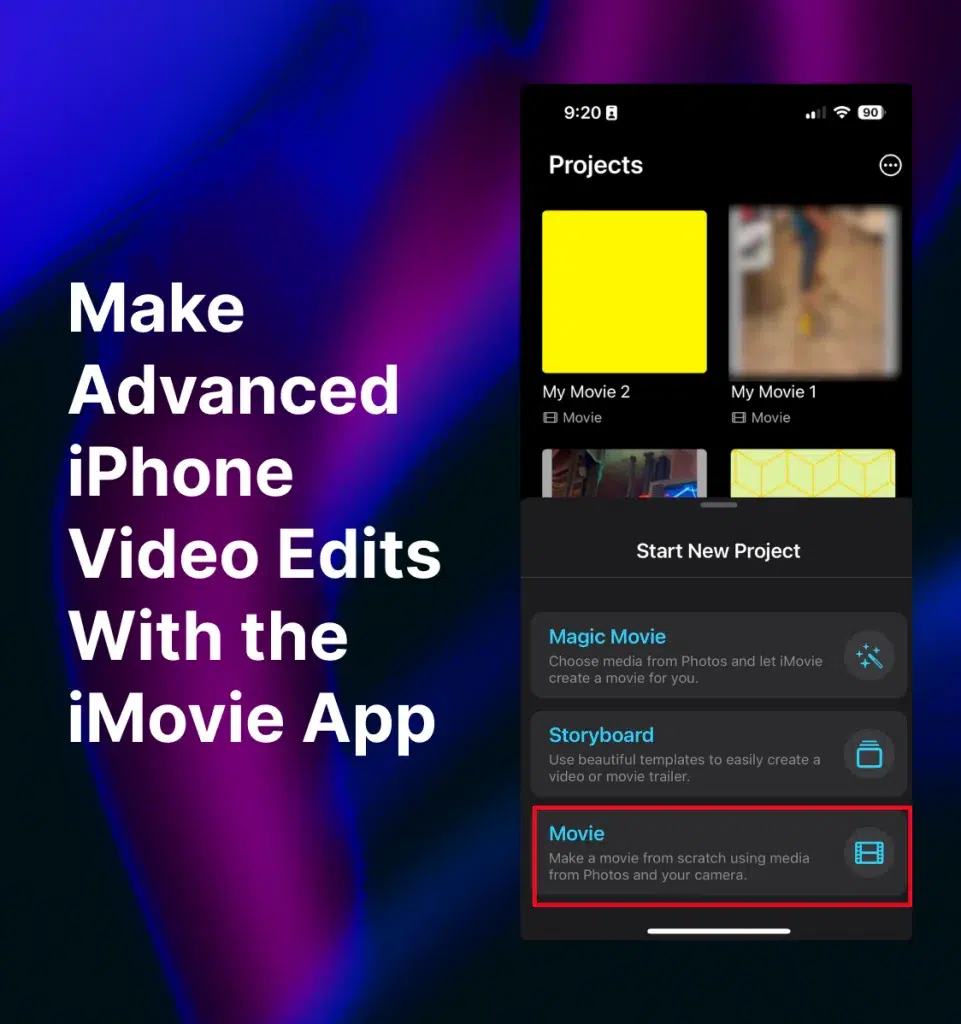
Make More Advanced iPhone Video Edits With the iMovie App
That’s not all you can do with your iPhone videos. Apple’s iMovie lets you make more video edits for free. You can create custom projects to combine video clips, add subtitles or other text, pipe in background music, and more.
To get started, open the iMovie app, then select “Movie” from the bottom of the “Start New Projects” screen. Select one or more movies you want to use in your project (be sure to select them in the order you want them to play in your final version), then tap “Create Movie” at the bottom.
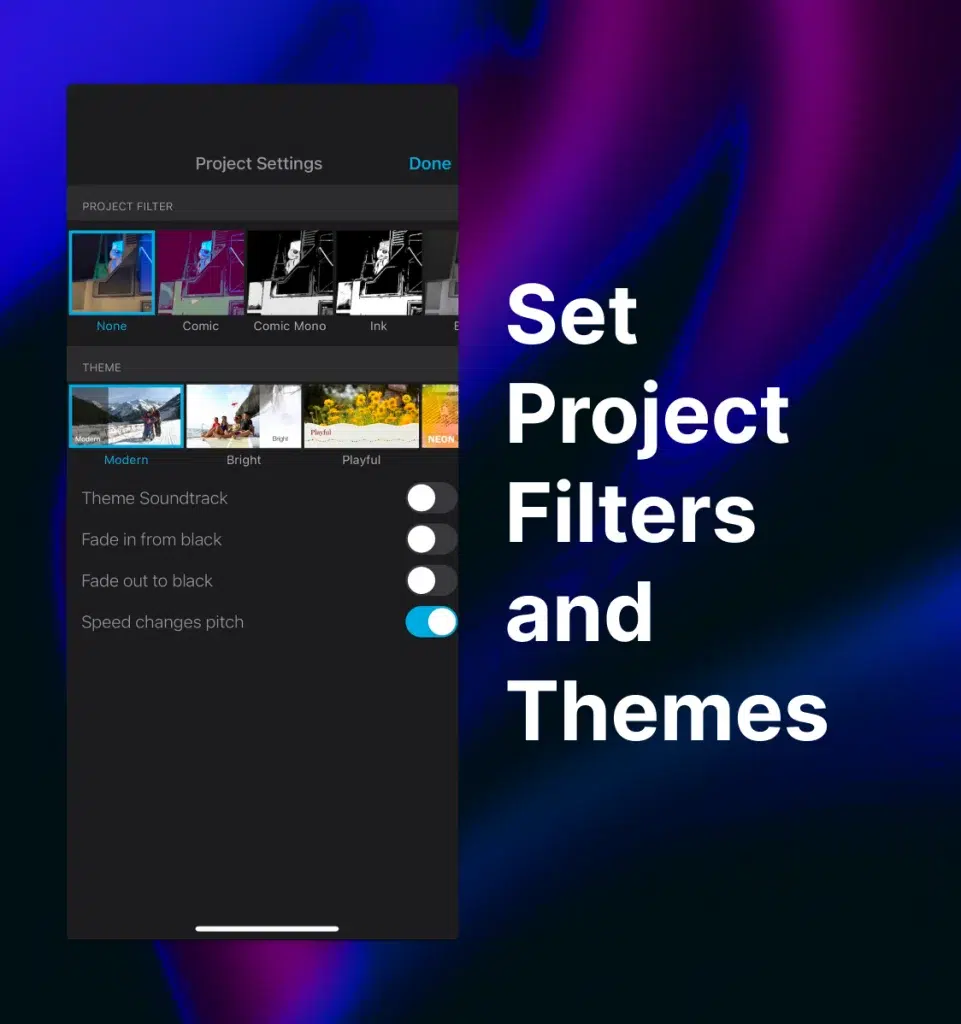
1. Set Project Filters and Themes
The first thing you’ll want to do when editing iPhone videos with iMovie is set the basic theme for your project.
Tap the settings gear at the bottom right corner of your movie, and you’ll see a new screen with selectors for project filters and themes. Below those, you’ll find options to add the default theme soundtrack, turn on a fade-in or fade-out, and select whether speed changes will affect the speed of the video audio.
Once you’ve made your adjustments, tap “Done” at the top right to return to your iOS video editing project.
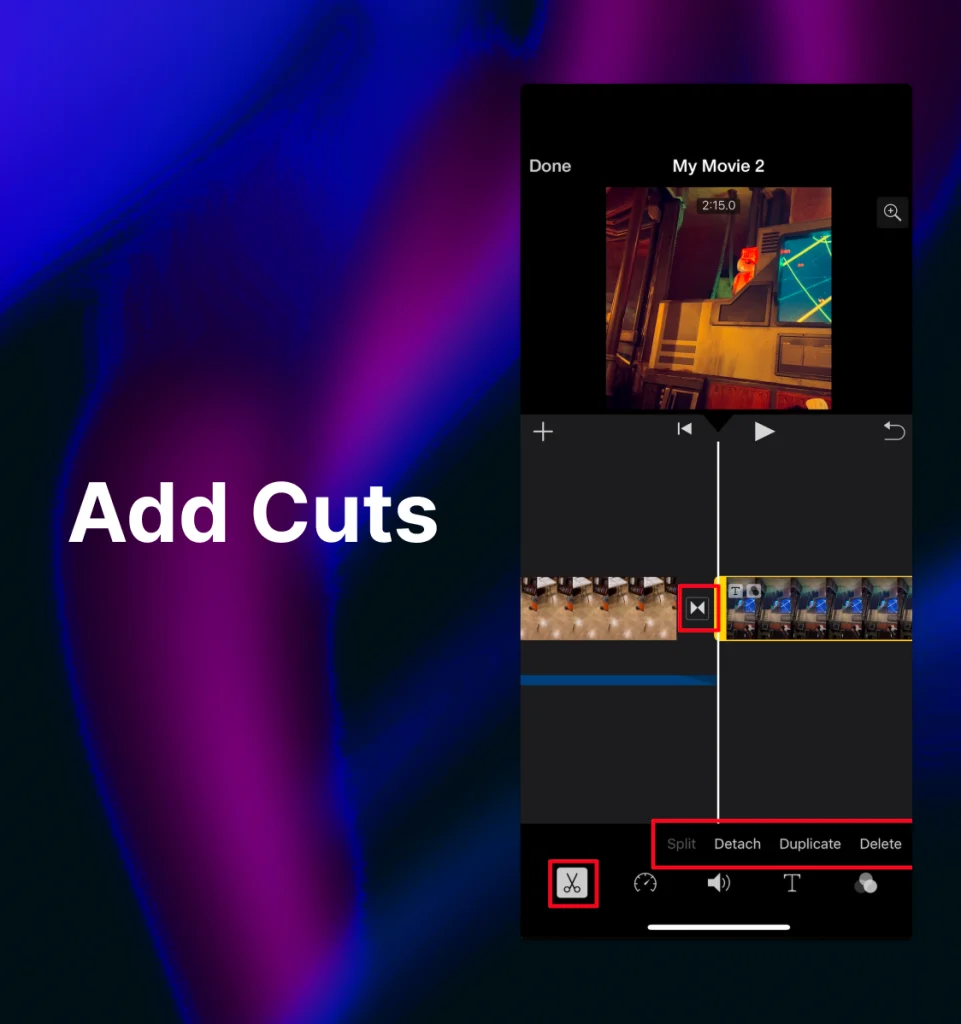
2. Add Cuts
Next, you can tweak the flow of your video. Tap the video scroll bar in the bottom third of the screen, and you’ll see several options underneath it. To make cuts and adjust transitions between clips, tap the scissors at the bottom left. You can then tap and hold at any point on the slider to add a transition before that segment and select your transition style.
In this screen, you can also hold and slide the yellow bars at the beginning or end of clips to cut out portions of your video. You’ll also notice options to make more advanced edits above the bottom row, including “Split,” Detach,” and “Duplicate.” Use these to add additional layers to your movie.
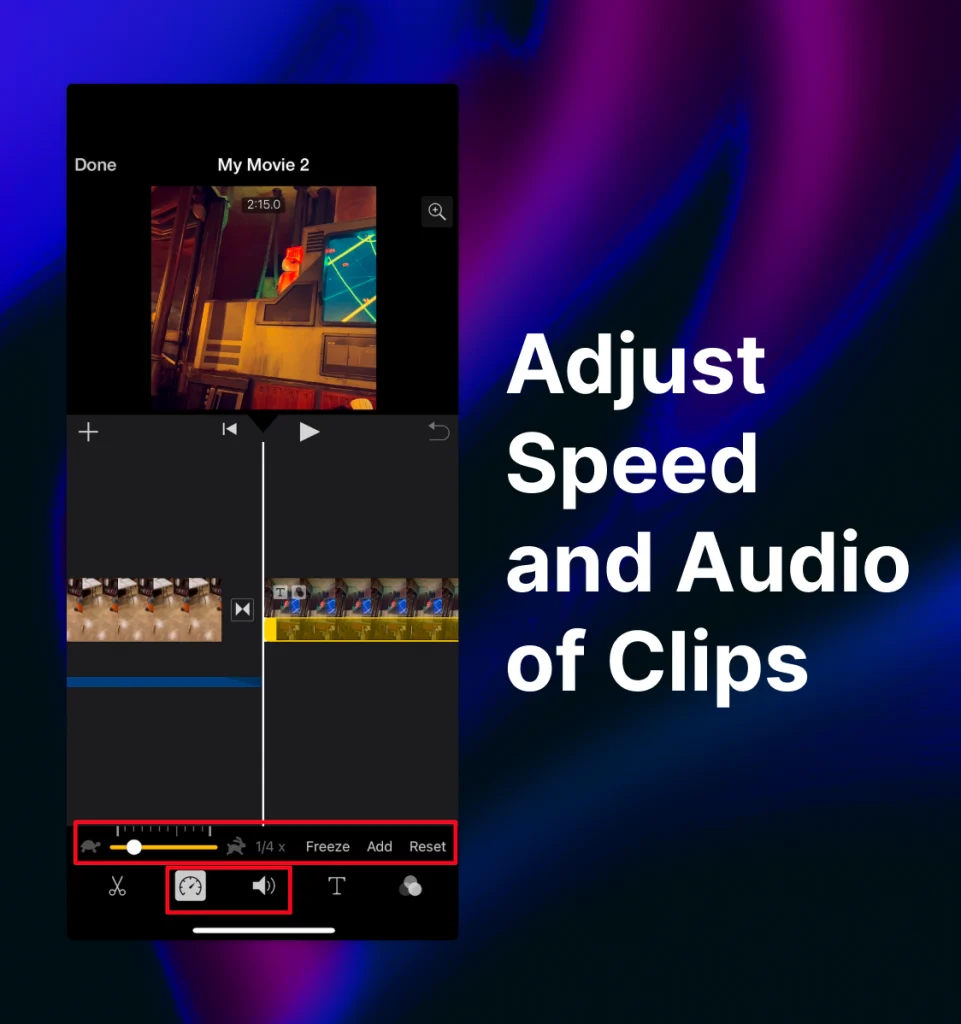
3.Adjust the Speed and Audio of Your Clips
The iMovie app also lets you adjust the speed and audio volume of each clip within your movie. Simply tap the clip within your project, then select the clock next to the scissors at the bottom of the screen. You can use the tortoise/hare slider to set the speed.
As a content creator, you’ll often want to add music or voiceovers to your clips, so you don’t want the recording audio to dominate. To adjust the audio volume of the same clip, tap the speaker next to the clock and adjust the slider to make it softer or louder.
4. Add Text
Want to add some additional flair or information to your video with on-screen text? You can easily do that in iMovie, too.
Tap the clip you’d like to add text to, then tap the “T” next to the audio control at the bottom of the screen. There, you can select your text style, then tap and hold the text on the video to move it where you want it on the screen. You can edit font, color, and other style elements with the options above the different text options.
Although you can use this feature to add captions to your video manually, it’s really designed for adding title text at transition points in your movie. For captions, a better option is to rely on Rev’s captioning services to quickly and easily add captions to all your video content before it goes live.

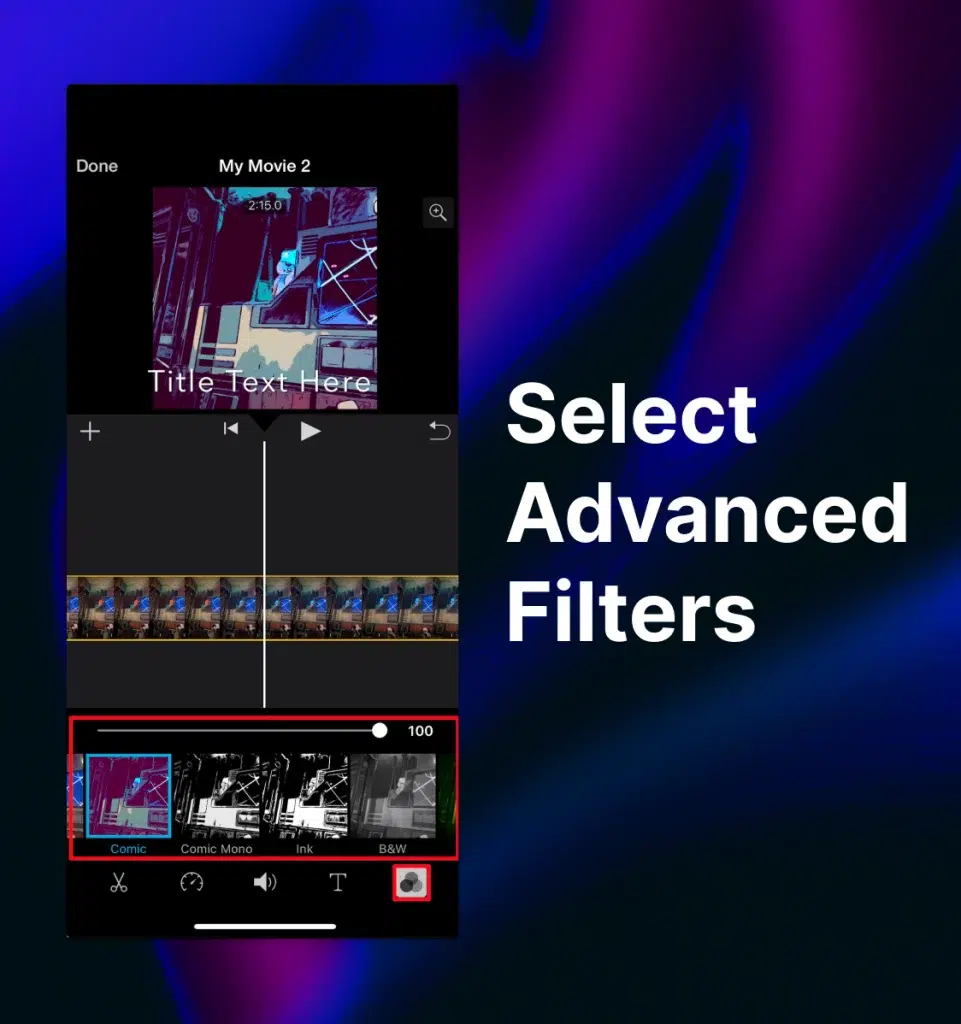
5. Select Advanced Filters
If you’re not happy with the filter options in the Photos app, iMovie offers a set of filters with more unique styles to further stylize your online videos. You can automatically make your video look like a comic book or ink drawing, an old Western movie, and more.
To browse options, select the filter tool at the bottom of the screen, to the right of the text editor. Select your filter of choice, then use the slider to adjust the intensity of the effect.
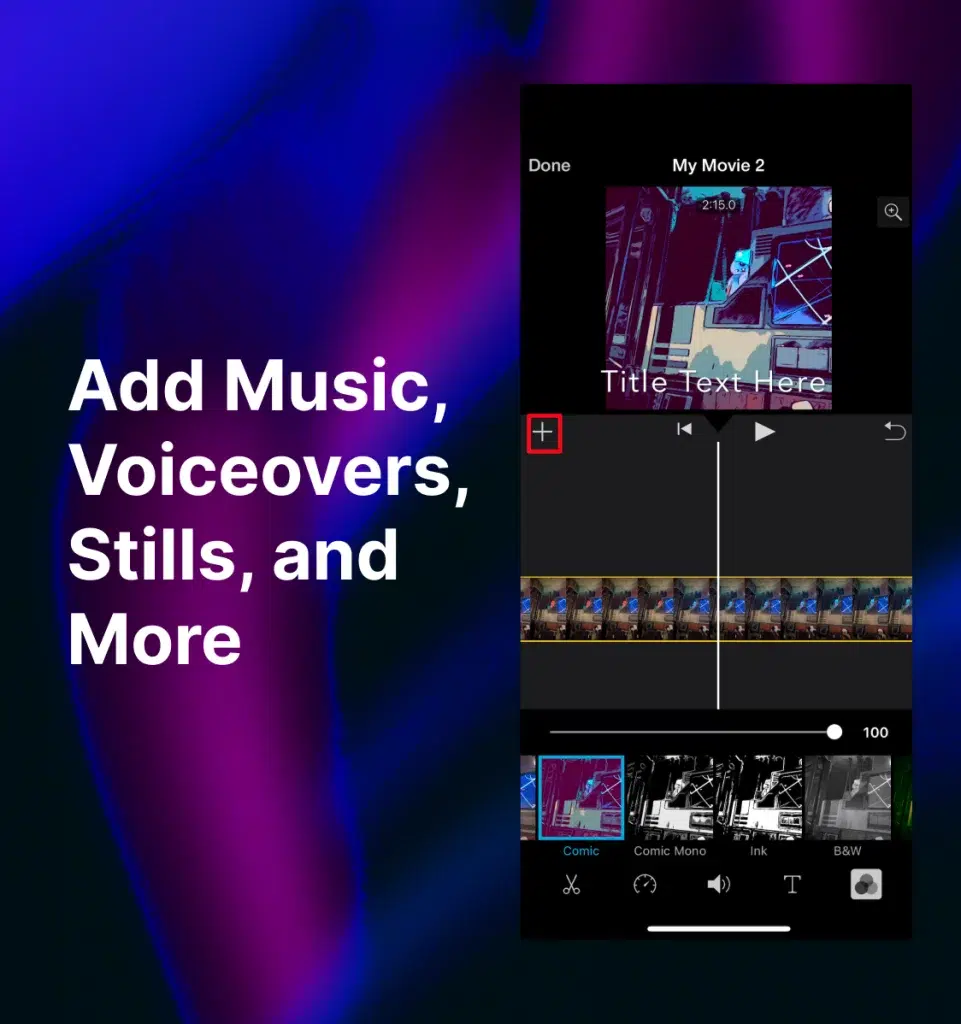
6. Add Music, Voiceovers, Stills, and More
The above steps only scratch the surface of what you can do with iMovie when editing video on your iPhone.
If you tap the “+” to the bottom left of the video playback section, you’ll see more options to insert additional clips and photo stills, create voice overs, and add music and sound effects to create a soundtrack for your video. You can also insert any of your own audio files, which you can easily create with the Rev mobile app to personalize your video even further.
Go Further With Professional Video Editing Apps
Looking for more fine-tuned, professional ways to edit iPhone videos? Several top-notch apps with mobile versions allow you to do all of the above and more. Mind you, these video-editing apps aren’t free, but some of our favorites include:
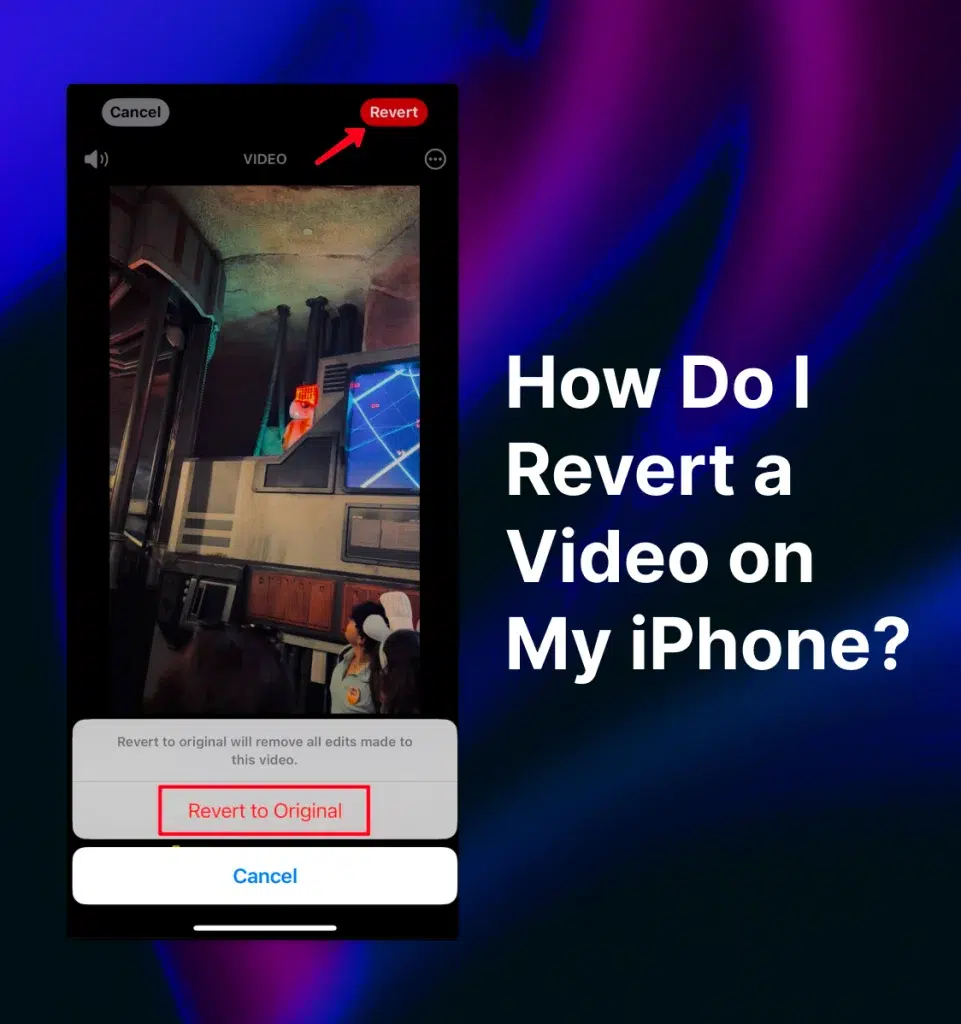
How Do I Revert a Video on My iPhone?
When editing a video in the Photos app, you can quickly undo any edits on the fly by tapping the “back” arrow at the top left after making a change. If you’ve already saved your changes, simply open the video and tap “Revert” at the top right of the screen, then confirm you’d like to “Revert to Original.”
Changes you make to your iMovie projects do not affect the original video clips, so you can always find the original files in your library.
Benefits of Editing Your Videos Well
Perhaps you’re just delving into the world of video content creation. In that case, you may wonder whether editing your iPhone videos before posting them on social media or other outlets is worth the extra effort. There are several advantages to editing your video, such as:
- It gives your platform or business a more polished, professional image.
- You don’t have to worry about capturing the scene perfectly or getting the lighting just right during shooting.
- You can add more branding and marketing elements to your videos.
- Well-edited videos with proper tagging, text, descriptions, and closed captions perform better on SEO and enhance engagement.
Grow Your Audience Like a Pro
Editing iPhone videos is a simple task that can yield big rewards for content creators. With a few simple steps in the Photos or iMovie app, you can make any video more professional and improve your chances of growing your audience.
As always, adding captions is a key element of creating accessible, engaging videos. When you’re finished editing your video, head over to Rev to add finishing touches with quick, accurate closed captions. And check out the best speech-to-text apps for iPhones to make captioning simple.
Heading
Heading 1
Heading 2
Heading 3
Heading 4
Heading 5
Heading 6
Lorem ipsum dolor sit amet, consectetur adipiscing elit, sed do eiusmod tempor incididunt ut labore et dolore magna aliqua. Ut enim ad minim veniam, quis nostrud exercitation ullamco laboris nisi ut aliquip ex ea commodo consequat. Duis aute irure dolor in reprehenderit in voluptate velit esse cillum dolore eu fugiat nulla pariatur.
Block quote
Ordered list
- Item 1
- Item 2
- Item 3
Unordered list
- Item A
- Item B
- Item C
Bold text
Emphasis
Superscript
Subscript


Subscribe to The Rev Blog
Sign up to get Rev content delivered straight to your inbox.