Home
How-to Guides
5 Incredibly Easy Steps to Add Subtitles and Captions to Camtasia

5 Incredibly Easy Steps to Add Subtitles and Captions to Camtasia

table of contents
Hungry For More?

Luckily for you, we deliver. Subscribe to our blog today.

Thank You for Subscribing!

A confirmation email is on it’s way to your inbox.

Share this post

Adding Captions and Subtitles to Your Camtasia Studio Project

Camtasia offers three methods for adding captions and subtitles to your videos. One option is to type in the captions manually. The second option is to sync captions from a script file, but this approach to Camtasia captioning is a Windows-only feature. So, let’s focus on the method that is both Mac and Windows-friendly in Camtasia Studio: Importing a caption file.

1. Create a Camtasia caption or subtitle file. 

An easy way to create your Camtasia caption file is to export your video and submit it for captioning. For example, you can upload your video file or provide a YouTube or Vimeo URL to Rev for subtitle creation and receive the completed caption file via email if you order here. You can request a SubRip (.SRT) file that’s compatible with Camtasia.

Rather not use SRT files? Rev now offers burned-in captions (open captions). Just check the “burned-in captions” box at checkout and you’ll receive a video with permanent, hard-coded captions added straight to your videos. Also available for foreign language subtitles!

open captions

2. Import your caption file into Camtasia Studio

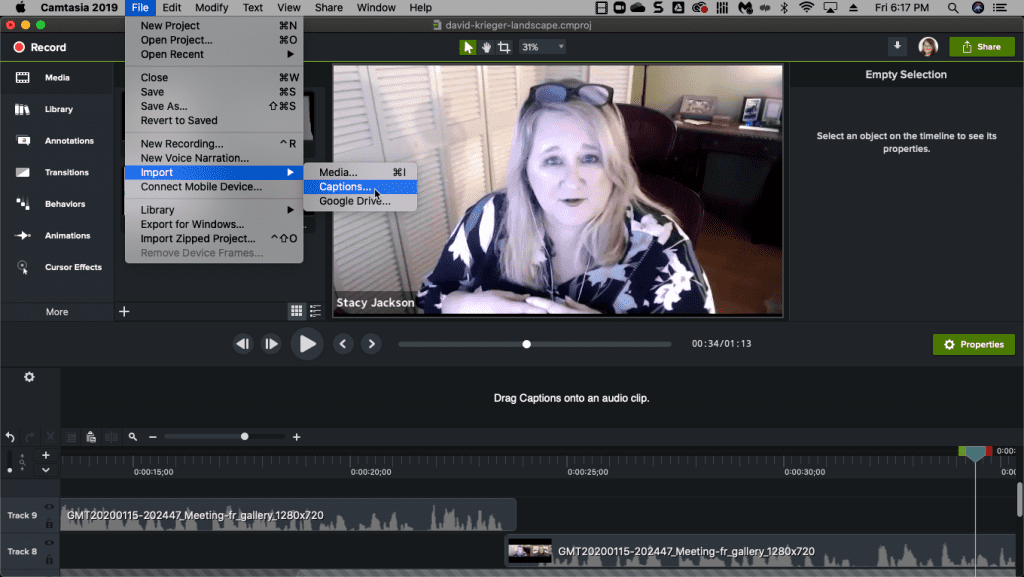
After creating your .SRT file, go back to Camtasia Studio and import the file. To import, follow these steps:

  • Go to File > Import > Captions
  • Find your .SRT file
  • Click import

Voila! Your Camtasia captions are ready to watch.
3. Watch your video and review

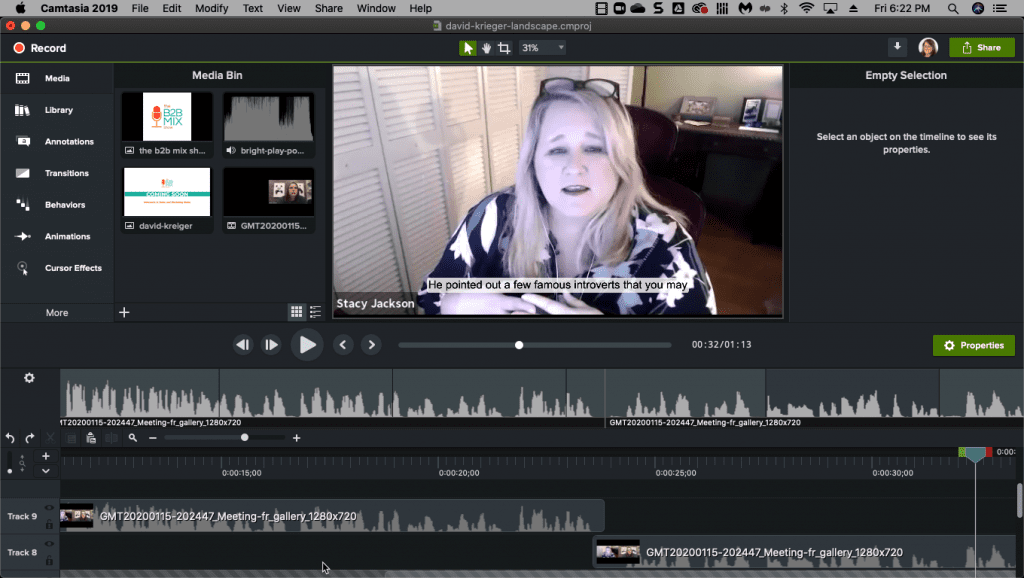
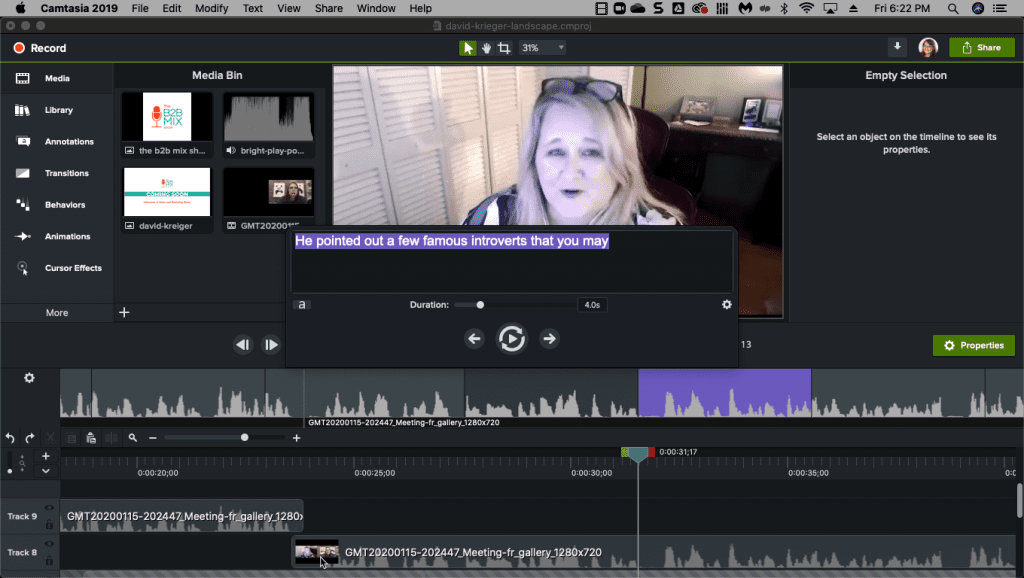
Once you’ve placed your Camtasia subtitles into your project, start watching to ensure the accuracy of the subtitles. If you find something that needs an edit, click on the caption and make necessary changes.
4. Export caption files when collaborating across platforms.

Unfortunately, Camtasia Studio project files don’t have cross-platform compatibility when it comes to captions. For example, if you’re a Windows user creating a video in Camtasia Studio, you must export your project’s .SRT file with any edits before handing it off to a colleague who uses Camtasia for Mac. 

The Mac user will need to import the .SRT file into Camtasia for Mac when working on the project.

5. Choose your preferred caption type in Camtasia Studio.

You can create the following types of Camtasia subtitle and caption formats:

Closed Captions

The viewer can turn closed captions on and off using the CC button on the video controller. These types of Camtasia captions are ADA-compliant, allow for customization, and are searchable when you produce Camtasia project as an MP4 video.

You will need to allow for playback in the Techsmith Smart Player to use this option.

To save your file with closed captions, use the following options.

Windows users:

Share > Custom Production > New Custom Production > MP4 > Next > Options tab > Captions > Caption type > Closed captions.

Mac users:

OPTION 1: Share > Screencast.com > Caption Style > Closed Captions

OPTION 2: Share > Local Drive > File format > MP4 > Export for Web Page > Caption Style > Closed Captions

Burned In Captions (Open Captions)

As the name of this Camtasia caption type implies, the verbiage is “burned into” the video. A viewer may not turn these captions off. Like the closed caption option, this type is also ADA compliant, searchable, and customizable.

To save your file with burned-in captions, use the following options.

Windows users:

Share > Custom Production > New Custom Production > MP4 > Next > Options tab > Captions > Caption type > Burned in captions

Mac users:

Share > Local Drive > File format > MP4 > Caption Style > Burned in captions

Under Video Captions

This type of subtitle appears under the video, and the viewer can’t turn it off. When you choose this type of Camtasia subtitle, you increase the vertical dimension of your video.

To save your file with under video captions, use the following options.

Windows users:

Share > Custom Production > New Custom Production > MP4 > Next > Options tab > Captions > Caption type > Under video captions 

Mac users:

Share > Local Drive > File format > MP4 > Export for Web Page > Caption Style > Under video captions

Managing Camtasia Subtitles and Captions

Camtasia Studio has made it incredibly simple for users to incorporate subtitles and captions into every video project. With consumers and businesses growing steadily more reliant on video, captions and subtitles are a must-have content element that will increase view time and improve accessibility.

Rev makes the whole captioning process even easier. Instead of spending time and effort manually transcribing your video to create your Camtasia captions or foreign language subtitles, use Rev for only $1.25 per minute.

Why You Should Add Captions to Camtasia

Are you adding captions to the videos you create with Camtasia Studio? If not, maybe you’re wondering what makes captions so important. Here are four reasons you need to use them in your video projects.

  • First, it’s important to understand the typical viewing habits. According to a study by Verizon Media and Publicis Media, 69 percent of people view videos without sound while in public. In private, 25 percent of people still report viewing videos without sound. Of those surveyed, 80 percent said they are more likely to watch a captioned video through to completion.
  • Second, popular browsers have begun automatically muting videos set to autoplay. If people can’t hear your video, they at least need to be able to read it. Your Camtasia captions could be the difference between watching and abandoning.
  • Third, you may find that you have customers or employees who do not speak English, or English isn’t their first language. Camtasia foreign language subtitles provided in a translation to a viewer’s native language can help convey the meaning you want your video to communicate.
  • Finally, captioning marketing content and corporate training videos can make your content accessible to those with disabilities. If your business must comply with the Americans with Disabilities Act (ADA), captions are essential. Even if you aren’t subject to the ADA, accessibility is a good business practice that you can accomplish with Camtasia captions.

Convinced that captions and subtitles are crucial? Terrific! Start by adding them to your next Camtasia project.

More captioning resources for video editing software

Subscribe to the Rev Blog

Lectus donec nisi placerat suscipit tellus pellentesque turpis amet.

Share this post

Subscribe to The Rev Blog

Sign up to get Rev content delivered straight to your inbox.

General

5 Incredibly Easy Steps to Add Subtitles and Captions to Camtasia

Adding Captions and Subtitles to Your Camtasia Studio Project

Camtasia offers three methods for adding captions and subtitles to your videos. One option is to type in the captions manually. The second option is to sync captions from a script file, but this approach to Camtasia captioning is a Windows-only feature. So, let’s focus on the method that is both Mac and Windows-friendly in Camtasia Studio: Importing a caption file.

1. Create a Camtasia caption or subtitle file. 

An easy way to create your Camtasia caption file is to export your video and submit it for captioning. For example, you can upload your video file or provide a YouTube or Vimeo URL to Rev for subtitle creation and receive the completed caption file via email if you order here. You can request a SubRip (.SRT) file that’s compatible with Camtasia.

Rather not use SRT files? Rev now offers burned-in captions (open captions). Just check the “burned-in captions” box at checkout and you’ll receive a video with permanent, hard-coded captions added straight to your videos. Also available for foreign language subtitles!

open captions

2. Import your caption file into Camtasia Studio

After creating your .SRT file, go back to Camtasia Studio and import the file. To import, follow these steps:

  • Go to File > Import > Captions
  • Find your .SRT file
  • Click import

Voila! Your Camtasia captions are ready to watch.

3. Watch your video and review

Once you’ve placed your Camtasia subtitles into your project, start watching to ensure the accuracy of the subtitles. If you find something that needs an edit, click on the caption and make necessary changes.

4. Export caption files when collaborating across platforms.

Unfortunately, Camtasia Studio project files don’t have cross-platform compatibility when it comes to captions. For example, if you’re a Windows user creating a video in Camtasia Studio, you must export your project’s .SRT file with any edits before handing it off to a colleague who uses Camtasia for Mac. 

The Mac user will need to import the .SRT file into Camtasia for Mac when working on the project.

5. Choose your preferred caption type in Camtasia Studio.

You can create the following types of Camtasia subtitle and caption formats:

Closed Captions

The viewer can turn closed captions on and off using the CC button on the video controller. These types of Camtasia captions are ADA-compliant, allow for customization, and are searchable when you produce Camtasia project as an MP4 video.

You will need to allow for playback in the Techsmith Smart Player to use this option.

To save your file with closed captions, use the following options.

Windows users:

Share > Custom Production > New Custom Production > MP4 > Next > Options tab > Captions > Caption type > Closed captions.

Mac users:

OPTION 1: Share > Screencast.com > Caption Style > Closed Captions

OPTION 2: Share > Local Drive > File format > MP4 > Export for Web Page > Caption Style > Closed Captions

Burned In Captions (Open Captions)

As the name of this Camtasia caption type implies, the verbiage is “burned into” the video. A viewer may not turn these captions off. Like the closed caption option, this type is also ADA compliant, searchable, and customizable.

To save your file with burned-in captions, use the following options.

Windows users:

Share > Custom Production > New Custom Production > MP4 > Next > Options tab > Captions > Caption type > Burned in captions

Mac users:

Share > Local Drive > File format > MP4 > Caption Style > Burned in captions

Under Video Captions

This type of subtitle appears under the video, and the viewer can’t turn it off. When you choose this type of Camtasia subtitle, you increase the vertical dimension of your video.

To save your file with under video captions, use the following options.

Windows users:

Share > Custom Production > New Custom Production > MP4 > Next > Options tab > Captions > Caption type > Under video captions 

Mac users:

Share > Local Drive > File format > MP4 > Export for Web Page > Caption Style > Under video captions

Managing Camtasia Subtitles and Captions

Camtasia Studio has made it incredibly simple for users to incorporate subtitles and captions into every video project. With consumers and businesses growing steadily more reliant on video, captions and subtitles are a must-have content element that will increase view time and improve accessibility.

Rev makes the whole captioning process even easier. Instead of spending time and effort manually transcribing your video to create your Camtasia captions or foreign language subtitles, use Rev for only $1.25 per minute.

Why You Should Add Captions to Camtasia

Are you adding captions to the videos you create with Camtasia Studio? If not, maybe you’re wondering what makes captions so important. Here are four reasons you need to use them in your video projects.

  • First, it’s important to understand the typical viewing habits. According to a study by Verizon Media and Publicis Media, 69 percent of people view videos without sound while in public. In private, 25 percent of people still report viewing videos without sound. Of those surveyed, 80 percent said they are more likely to watch a captioned video through to completion.
  • Second, popular browsers have begun automatically muting videos set to autoplay. If people can’t hear your video, they at least need to be able to read it. Your Camtasia captions could be the difference between watching and abandoning.
  • Third, you may find that you have customers or employees who do not speak English, or English isn’t their first language. Camtasia foreign language subtitles provided in a translation to a viewer’s native language can help convey the meaning you want your video to communicate.
  • Finally, captioning marketing content and corporate training videos can make your content accessible to those with disabilities. If your business must comply with the Americans with Disabilities Act (ADA), captions are essential. Even if you aren’t subject to the ADA, accessibility is a good business practice that you can accomplish with Camtasia captions.

Convinced that captions and subtitles are crucial? Terrific! Start by adding them to your next Camtasia project.

More captioning resources for video editing software

The event's speakers are:

No items found.