Home
How to Set Up the Rev.com API in Postman

How to Set Up the Rev.com API in Postman

table of contents
Hungry For More?

Luckily for you, we deliver. Subscribe to our blog today.

Thank You for Subscribing!

A confirmation email is on it’s way to your inbox.

Share this post

When working with the Rev transcription services, you’ll be interfacing with either the Rev.com or Rev.ai APIs. For more details on the differences and the use cases for these, see our article here. In this article, we’ll walk you through how to get your credentials for the Rev.com API up and running, how to perform authentication and log-in, and how to submit requests to various endpoints in order to get your transcriptions completed. (Note: If you’re looking for the step-by-step guide to how to set up the Rev.ai API, you can find that right here.)

If you’re not the most tech-savvy person out there, fear not. An API is just a fancy acronym for an Application Programming Interface. This interface defines a set of endpoints which users submit requests to in order to trigger different behaviors from the backend system. These requests are typically HTTP requests, i.e. they’re submitted over the same HTTP protocol that you use when visiting websites. Data is usually sent to and from the endpoints using a structured format such as XML or, more frequently, JSON. If you have a programming background then you’re likely already familiar with APIs and these sorts of requests. If not, you will get up to speed quickly. All that is required to use an API is either a few lines of code in a language such as Python or using a user-friendly tool such as Postman.

Starting in the Sandbox

For the purposes of this article, we’ll be using the Rev API sandbox to show you how to create authentication credentials, submit orders and query endpoints, receive back data from the API, and more. The sandbox allows us to do all of this on a trial basis so that you can get familiar with the system and the order workflow without incurring any charges. 

We’ll start with the Rev.com API. First things first, you’ll need to request credentials for the sandbox. To do so, visit this link and click the highlighted text which reads “If you don’t have these keys for the sandbox, you can get them here.” Type your information into the form that pops up, and your new sandbox keys will be emailed to you. You’ll be given two api keys: a client key and a user key. Copy them both to a safe location on your local hard drive.

Next, we’ll make our first request! We recommend that you use Postman for this tutorial which you can download here. Alternatively, you can use one of the many SDKs available for the Rev.com API in Ruby, PHP, or Python. These are great if you have an application with existing source code that needs to make requests to the Rev APIs on your behalf.

When submitting a Rev.com API request, you will use a specific URL associated with the specific functional you are looking to use. Each such URL can be broken down into three parts:

The base url is used to point to Rev’s backend. For the sandbox, this is api-sandbox.rev.com and for the production API it is simply www.rev.com. Next, we include a version number such as “v1” corresponding to the API version that we want to use. In fact, v1 is the only version available right now, but that may change in the future. Finally, the function variable refers to the specific functionality you’re looking to get out of a given API request. This can be something like “orders” to get all the orders associated with your account or “attachments” to add an attachment to one of your orders.


Our First Request: Getting Orders

Now, let’s create our first request. Fire up Postman and you’ll be presented with a screen that looks like this.

Click on the “Request” button to create a basic request. You’ll then see a new screen pop up which asks you to name the request, provide an optional description, and specify a collection to save the request to. You can create a collection for Rev.com API requests and write a name and description that look something like this:
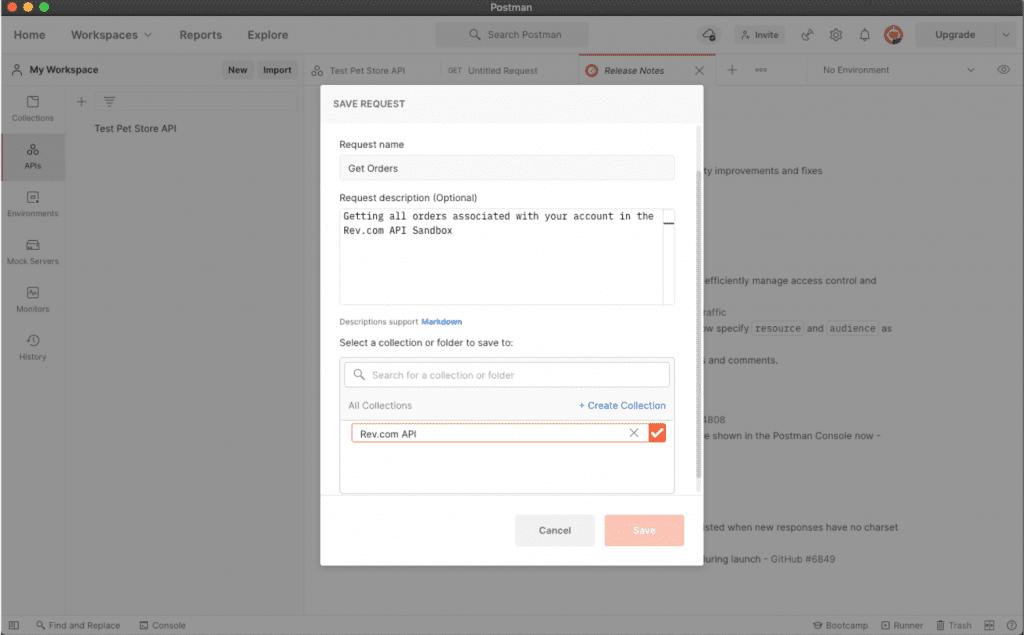
Once this is completed, we’ll be able to create the actual request. This will be a GET request meaning that it gets some information from the Rev servers, in this case the list of orders associated with our account. We place the url “https://api-sandbox.rev.com/api/v1/orders” in the URL box and then we click on the “Authorization” tab to add some authorization headers to our request. This is what the Rev API looks at to authenticate us within the system and retrieve the orders associated with our account. We use the key “Authorization” and value “Rev CLIENT_KEY:USER_KEY” where you replace the CLIENT_KEY and USER_KEY variables with the keys that were generated for you. You can now hit “send” to generate and send the request.

If everything goes well, you should see a response like the one depicted in this screenshot:
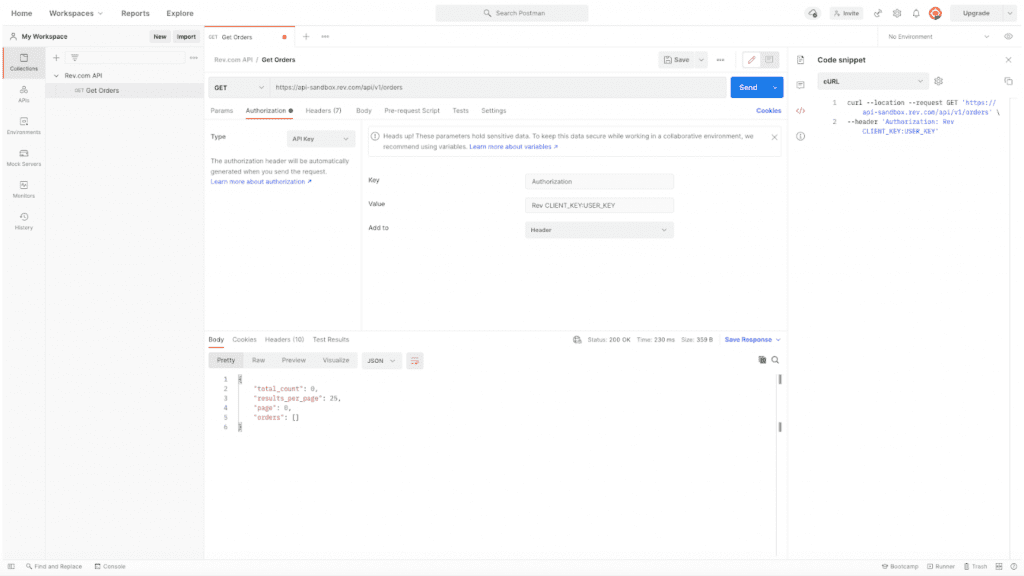
You will see that the value “total_count” is set to 0 and the list “orders” is empty because we currently have no orders associated with our account. Let’s remedy that. 

Creating a New Order

Create a new request and name it as before. This request will be different from the last in that it is a POST request, meaning that we’ll be sending data to the Rev.com API. The URL is the same as before. You will also need to add authorization headers like we did for the last request.

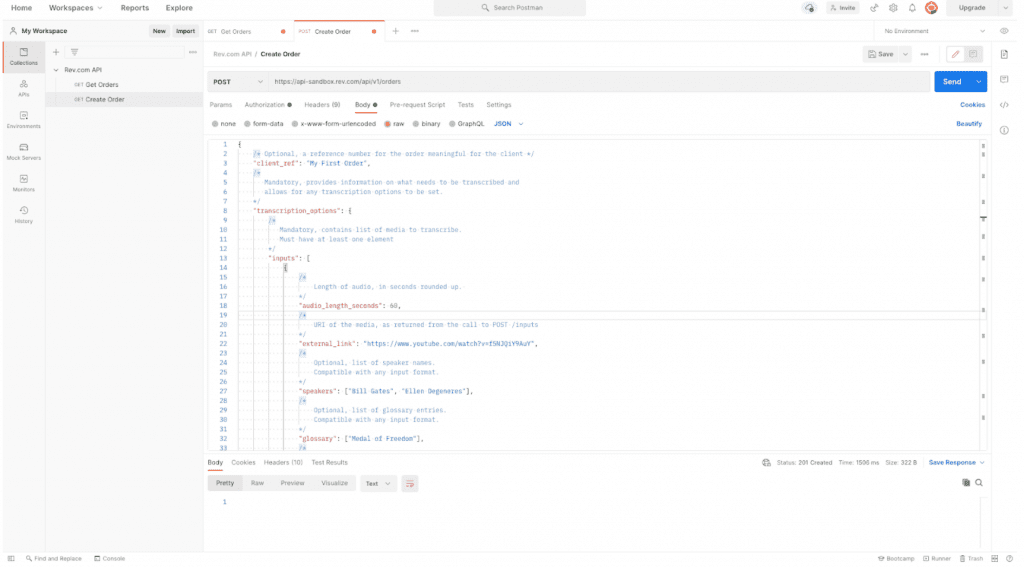
Now, we need to add one more additional parameter to our request. This is the request body. Since we are creating a POST request, we provide a JSON dictionary of parameters that provide information about our order to the Rev.com API. Here is the example dictionary we’ll be using for this order.

Copy this JSON and paste it into the body text box within Postman. Make sure you select “JSON” from the dropdown as the data type. You’ll see that in this dictionary we have a number of different parameters that describe different aspects of the order to the Rev client backend. Hopefully the comments in the text are clarifying enough, but we’ll cover a few of the details just to be sure. For this request, we have a list of “inputs”. An order can contain multiple input media files that you want transcribed. This order will have just one, an interview of Bill Gates on the Ellen Degeneres Show. We provide a link to the URL which specifies a Youtube video of this interview. We also provide some details about the speakers, namely Bill Gates and Ellen Degeneres. Notice how we’re able to include a list of accent types to help increase the accuracy of the transcription? We mark Bill Gates’ accent as “AmericanNeutral.” While Ellen doesn’t really have an accent, she is from New Orleans, so we’ll mark her accent as “AmericanSouthern” just to illustrate another option. We can also provide a glossary of uncommon terms that might show up in the transcription and be helpful for transcribers to know. For this media, we provide the glossary term “Medal of Freedom.”

Finally, we provide a number of other pieces of metadata that are used to specify details of the order. We can specify output formats for the transcription, whether we want the file to be transcribed verbatim, whether we want the order rushed, etc. Some of these options incur an extra charge, so be sure to research each parameter in the documentation prior to using it. Here is what the final request looks like with the request body in place. Be sure to double check everything, then click send to submit the job!

Now, let’s go back to our order GET request to make sure that the order has been received. Because the request has already been set up, we shouldn’t need to add any more info. Just click send and take a look at what is returned in the response body. You should now get a read back of data that looks something like this:

You can see that our order has been created with a unique order number, the associated price, the status (mine is “Complete”) because it’s been running for a while, and more.

Getting Our Transcription

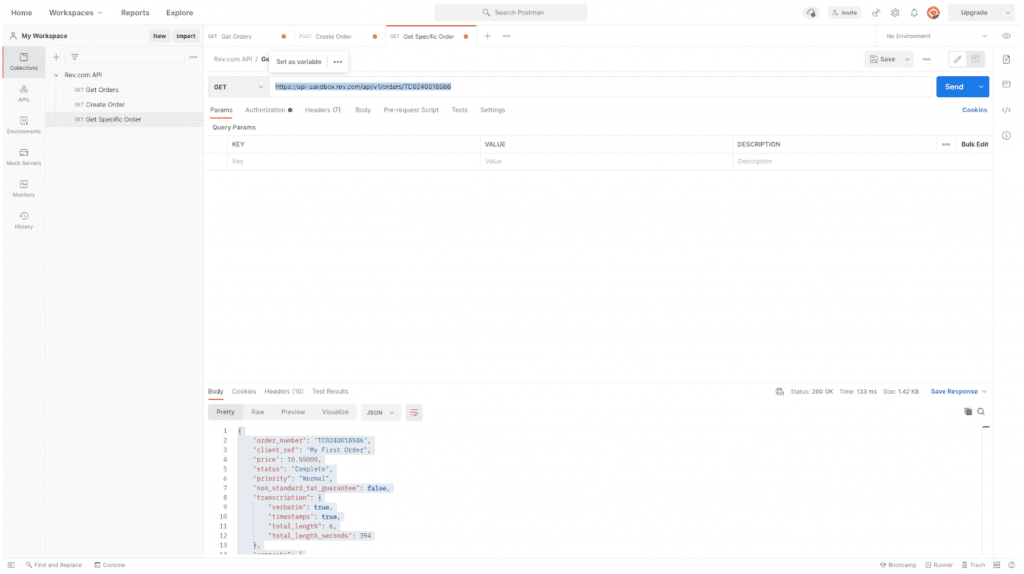
Wait a few minutes and then submit another GET request to the orders endpoint. Your order should show as “Completed” at that time indicating that the file has been transcribed. Once that status shows, we need to make one more request to get the final transcription and download it to our computer. To do so, we add one more parameter onto the URL of the orders endpoint: our order number. The URL should look something like this:

https://api-sandbox.rev.com/api/v1/orders/TC0240018586

You should replace the “TC0240018586” with your own order number as taken from the API response. Once more, you will need to specify this as a GET request and provide the authorization header. Once you have the request ready, click send. You should be greeted with a response that looks something like this:

And we’ll provide the entire JSON of the response for clarity.

You can see that two new fields have been populated that were not in the GET ALL ORDERS endpoint: comments and attachments. “Comments” just contains various comments about the order. “Attachments” is where the real magic happens. Here you will find the links to download your transcriptions in whatever formats you requested them in. We requested transcriptions in MS Word and JSON formats so we are provided with two such links. Now, if you actually navigate to these URLs you will get a “Page not found” error. This is solely because we used the sandbox and did not pay for transcriptions. In the real version of the API, you will be able to navigate to these URLs and have them download to your computer.

And that’s all there is to it, an entire Rev.com order from start to finish!


Topics:
No items found.
Subscribe to the Rev Blog

Lectus donec nisi placerat suscipit tellus pellentesque turpis amet.

Share this post

Subscribe to The Rev Blog

Sign up to get Rev content delivered straight to your inbox.

General

How to Set Up the Rev.com API in Postman

When working with the Rev transcription services, you’ll be interfacing with either the Rev.com or Rev.ai APIs. For more details on the differences and the use cases for these, see our article here. In this article, we’ll walk you through how to get your credentials for the Rev.com API up and running, how to perform authentication and log-in, and how to submit requests to various endpoints in order to get your transcriptions completed. (Note: If you’re looking for the step-by-step guide to how to set up the Rev.ai API, you can find that right here.)

If you’re not the most tech-savvy person out there, fear not. An API is just a fancy acronym for an Application Programming Interface. This interface defines a set of endpoints which users submit requests to in order to trigger different behaviors from the backend system. These requests are typically HTTP requests, i.e. they’re submitted over the same HTTP protocol that you use when visiting websites. Data is usually sent to and from the endpoints using a structured format such as XML or, more frequently, JSON. If you have a programming background then you’re likely already familiar with APIs and these sorts of requests. If not, you will get up to speed quickly. All that is required to use an API is either a few lines of code in a language such as Python or using a user-friendly tool such as Postman.

Starting in the Sandbox

For the purposes of this article, we’ll be using the Rev API sandbox to show you how to create authentication credentials, submit orders and query endpoints, receive back data from the API, and more. The sandbox allows us to do all of this on a trial basis so that you can get familiar with the system and the order workflow without incurring any charges. 

We’ll start with the Rev.com API. First things first, you’ll need to request credentials for the sandbox. To do so, visit this link and click the highlighted text which reads “If you don’t have these keys for the sandbox, you can get them here.” Type your information into the form that pops up, and your new sandbox keys will be emailed to you. You’ll be given two api keys: a client key and a user key. Copy them both to a safe location on your local hard drive.

Next, we’ll make our first request! We recommend that you use Postman for this tutorial which you can download here. Alternatively, you can use one of the many SDKs available for the Rev.com API in Ruby, PHP, or Python. These are great if you have an application with existing source code that needs to make requests to the Rev APIs on your behalf.

When submitting a Rev.com API request, you will use a specific URL associated with the specific functional you are looking to use. Each such URL can be broken down into three parts:

The base url is used to point to Rev’s backend. For the sandbox, this is api-sandbox.rev.com and for the production API it is simply www.rev.com. Next, we include a version number such as “v1” corresponding to the API version that we want to use. In fact, v1 is the only version available right now, but that may change in the future. Finally, the function variable refers to the specific functionality you’re looking to get out of a given API request. This can be something like “orders” to get all the orders associated with your account or “attachments” to add an attachment to one of your orders.


Our First Request: Getting Orders

Now, let’s create our first request. Fire up Postman and you’ll be presented with a screen that looks like this.

Click on the “Request” button to create a basic request. You’ll then see a new screen pop up which asks you to name the request, provide an optional description, and specify a collection to save the request to. You can create a collection for Rev.com API requests and write a name and description that look something like this:

Once this is completed, we’ll be able to create the actual request. This will be a GET request meaning that it gets some information from the Rev servers, in this case the list of orders associated with our account. We place the url “https://api-sandbox.rev.com/api/v1/orders” in the URL box and then we click on the “Authorization” tab to add some authorization headers to our request. This is what the Rev API looks at to authenticate us within the system and retrieve the orders associated with our account. We use the key “Authorization” and value “Rev CLIENT_KEY:USER_KEY” where you replace the CLIENT_KEY and USER_KEY variables with the keys that were generated for you. You can now hit “send” to generate and send the request.

If everything goes well, you should see a response like the one depicted in this screenshot:

You will see that the value “total_count” is set to 0 and the list “orders” is empty because we currently have no orders associated with our account. Let’s remedy that. 

Creating a New Order

Create a new request and name it as before. This request will be different from the last in that it is a POST request, meaning that we’ll be sending data to the Rev.com API. The URL is the same as before. You will also need to add authorization headers like we did for the last request.

Now, we need to add one more additional parameter to our request. This is the request body. Since we are creating a POST request, we provide a JSON dictionary of parameters that provide information about our order to the Rev.com API. Here is the example dictionary we’ll be using for this order.

Copy this JSON and paste it into the body text box within Postman. Make sure you select “JSON” from the dropdown as the data type. You’ll see that in this dictionary we have a number of different parameters that describe different aspects of the order to the Rev client backend. Hopefully the comments in the text are clarifying enough, but we’ll cover a few of the details just to be sure. For this request, we have a list of “inputs”. An order can contain multiple input media files that you want transcribed. This order will have just one, an interview of Bill Gates on the Ellen Degeneres Show. We provide a link to the URL which specifies a Youtube video of this interview. We also provide some details about the speakers, namely Bill Gates and Ellen Degeneres. Notice how we’re able to include a list of accent types to help increase the accuracy of the transcription? We mark Bill Gates’ accent as “AmericanNeutral.” While Ellen doesn’t really have an accent, she is from New Orleans, so we’ll mark her accent as “AmericanSouthern” just to illustrate another option. We can also provide a glossary of uncommon terms that might show up in the transcription and be helpful for transcribers to know. For this media, we provide the glossary term “Medal of Freedom.”

Finally, we provide a number of other pieces of metadata that are used to specify details of the order. We can specify output formats for the transcription, whether we want the file to be transcribed verbatim, whether we want the order rushed, etc. Some of these options incur an extra charge, so be sure to research each parameter in the documentation prior to using it. Here is what the final request looks like with the request body in place. Be sure to double check everything, then click send to submit the job!
Now, let’s go back to our order GET request to make sure that the order has been received. Because the request has already been set up, we shouldn’t need to add any more info. Just click send and take a look at what is returned in the response body. You should now get a read back of data that looks something like this:

You can see that our order has been created with a unique order number, the associated price, the status (mine is “Complete”) because it’s been running for a while, and more.

Getting Our Transcription

Wait a few minutes and then submit another GET request to the orders endpoint. Your order should show as “Completed” at that time indicating that the file has been transcribed. Once that status shows, we need to make one more request to get the final transcription and download it to our computer. To do so, we add one more parameter onto the URL of the orders endpoint: our order number. The URL should look something like this:

https://api-sandbox.rev.com/api/v1/orders/TC0240018586

You should replace the “TC0240018586” with your own order number as taken from the API response. Once more, you will need to specify this as a GET request and provide the authorization header. Once you have the request ready, click send. You should be greeted with a response that looks something like this:
And we’ll provide the entire JSON of the response for clarity.

You can see that two new fields have been populated that were not in the GET ALL ORDERS endpoint: comments and attachments. “Comments” just contains various comments about the order. “Attachments” is where the real magic happens. Here you will find the links to download your transcriptions in whatever formats you requested them in. We requested transcriptions in MS Word and JSON formats so we are provided with two such links. Now, if you actually navigate to these URLs you will get a “Page not found” error. This is solely because we used the sandbox and did not pay for transcriptions. In the real version of the API, you will be able to navigate to these URLs and have them download to your computer.

And that’s all there is to it, an entire Rev.com order from start to finish!


The event's speakers are:

No items found.