Home
How-to Guides
How to Transcribe Lifesize Video Conference Meeting Recordings

How to Transcribe Lifesize Video Conference Meeting Recordings

table of contents
Hungry For More?

Luckily for you, we deliver. Subscribe to our blog today.

Thank You for Subscribing!

A confirmation email is on it’s way to your inbox.

Share this post

Video conferencing has been essential for a while now, allowing businesses to communicate effectively with other teams, external contractors, and clients even if they’re on the other side of the world. 

As a result, there are plenty of video conferencing tools designed to facilitate this. Lifesize is one of the best options out there. It offers 4K video conferencing, pristine audio, and crystal-clear content and screen sharing options. Though it isn’t free like other tools like Google Hangouts or Zoom, the quality of these calls will be higher; this results in fewer technical difficulties and providing everyone with a more positive experience. It also makes your brand look professional and credible, which isn’t too shabby, either.

As COVID-19 has forced businesses to shift to work-at-home models, video conferencing is more important than ever before. As a result, making these recordings accessible through transcripts is also now even more crucial. 

In this post, we’re going to discuss how to transcribe Lifesize recordings and why you should do so. 

Why You Should Always Transcribe Lifesize Recordings

You can and should record Lifesize calls, providing audio and video of the meeting after the fact. While this is useful, transcribing those recordings is always beneficial to businesses.

There are two main reasons for this: 

1. Transcripts Are Easier to Review  

If you want to keep track of what happened during a meeting, there’s no better way to do so than with a transcript. It’s faster to read a transcript than listen through the calls, especially since they’re easier to scan. If you’re in a rush and know what you’re looking for, you could even use the search feature to find a specific section quickly. This is extremely valuable for internal use. 

2. Transcripts Are More Accessible

 Heightened accessibility is good for both inclusivity and for meeting ADA requirements. Transcripts allow those who are deaf or hard of hearing to get the information discussed during the call. You want everyone involved to be able to access this information so that they’re on the same page, but also to prevent ADA-related lawsuits, which have increased year-over-year for awhile now.

Keep in mind that offering transcripts and/or closed captions for video and audio is actually a requirement from the ADA to ensure equal accessibility.

How to Record Lifesize Meetings 

Recording Lifesize meetings is exceptionally simple.

Once your call has begun and participants have joined, you’ll see an icon with a small white circle along the bottom of the screen next to the options to invite new participants and turn your video or sound on or off. Click it to start recording. 

Once the meeting is over, you can click the “Stop recording” button. This will automatically save the call. 

You can find the video by heading to your navigational dashboard and finding “Recordings Feed” under “Recordings.” Here, you can select the specific conference that you want to review. 
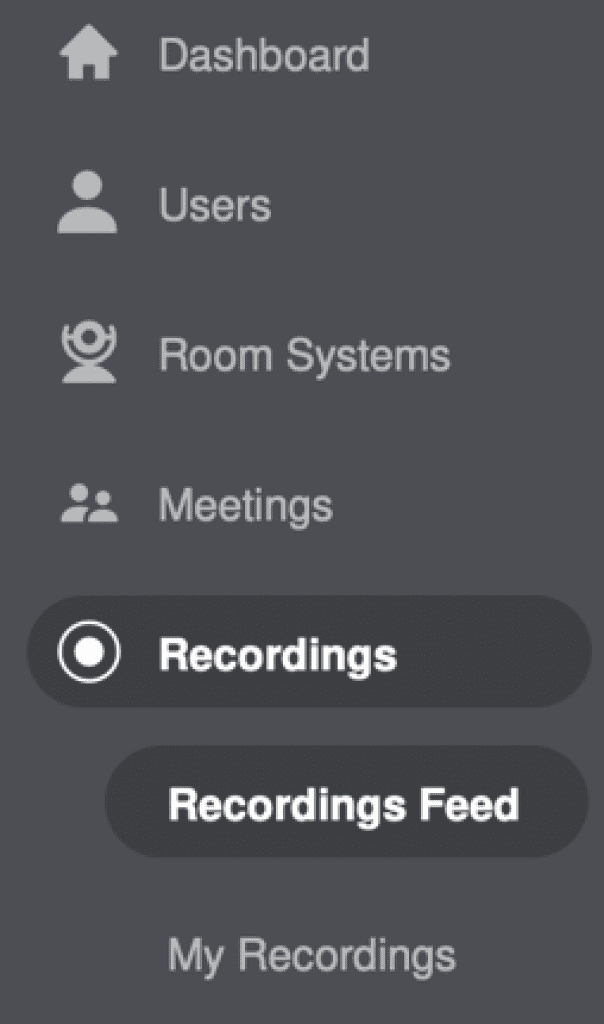
Then, you can either download the file or get a link to share with whoever you’d like to view the recording. This only takes a few seconds.

How to Transcribe Lifesize Meeting Recordings with Rev 

Just as recording a video conference with Lifesize is simple, ordering transcripts of your Lifesize meetings with Rev is incredibly easy, too. Just follow these steps:

1. Go to the Rev.com Transcriptions page and click “Get Started”

2. Upload your video files to Rev

You can upload the files directly, share the URL to the recording, or pull the video from a Youtube or Vimeo account if your video is uploaded there. 

3. Choose to add timestamps to the transcript (if needed)

If you want to add closed captions to videos (which you may want to do, for example, if you want to publish a webinar recording and ensure that it’s accessible), choose the option that allows you to get timestamps on the transcript. This makes it easy to upload closed captions and subtitles with video editors, saving you an enormous amount of time.

4. Sit back with the transcription professionals do their job

Rev has over 50,000 professional transcriptionists who are available around the clock to tackle your projects. They’ll guarantee 99% accuracy or higher every time, and typically within 24 hours. 

You can also order professional closed captions from Rev, in the form of SRT files (the most popular caption file). This allows you to add closed captions to your meeting recordings with video editing software.
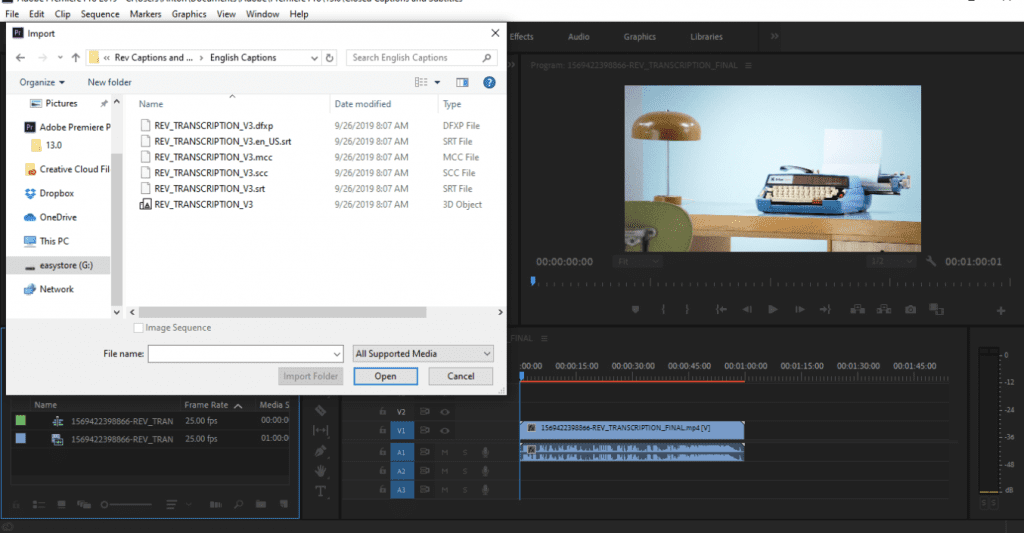
You can use the video editing software of your choice to add captions to your video recording. Simply open the video file, and then look for the option to add closed captions with the SRT file. You can see how to do this using Adobe Premiere Pro here.

Final Thoughts 

Lifesize is an exceptional tool, especially when you want to create a high-quality conference experience that reduces some of the almost-painful conference call cliches like “sorry, I can’t hear you” or “oh no, it looks a little glitchy.” This makes it a great choice for internal conference calls, client meetings, and even promotional events like webinars. 

Make sure that you’re taking full advantage of these calls and transcribe Lifesize recordings every time. Whether want to simply store the transcripts for your own records or upload closed captions to internal and external resources, this can save you a lot of time and make your life much easier.

Ready to get transcripts of your Lifesize video recordings? Get started transcribing now.

Subscribe to the Rev Blog

Lectus donec nisi placerat suscipit tellus pellentesque turpis amet.

Share this post

Subscribe to The Rev Blog

Sign up to get Rev content delivered straight to your inbox.

General

How to Transcribe Lifesize Video Conference Meeting Recordings

Video conferencing has been essential for a while now, allowing businesses to communicate effectively with other teams, external contractors, and clients even if they’re on the other side of the world. 

As a result, there are plenty of video conferencing tools designed to facilitate this. Lifesize is one of the best options out there. It offers 4K video conferencing, pristine audio, and crystal-clear content and screen sharing options. Though it isn’t free like other tools like Google Hangouts or Zoom, the quality of these calls will be higher; this results in fewer technical difficulties and providing everyone with a more positive experience. It also makes your brand look professional and credible, which isn’t too shabby, either.

As COVID-19 has forced businesses to shift to work-at-home models, video conferencing is more important than ever before. As a result, making these recordings accessible through transcripts is also now even more crucial. 

In this post, we’re going to discuss how to transcribe Lifesize recordings and why you should do so. 

Why You Should Always Transcribe Lifesize Recordings

You can and should record Lifesize calls, providing audio and video of the meeting after the fact. While this is useful, transcribing those recordings is always beneficial to businesses.

There are two main reasons for this: 

1. Transcripts Are Easier to Review  

If you want to keep track of what happened during a meeting, there’s no better way to do so than with a transcript. It’s faster to read a transcript than listen through the calls, especially since they’re easier to scan. If you’re in a rush and know what you’re looking for, you could even use the search feature to find a specific section quickly. This is extremely valuable for internal use. 

2. Transcripts Are More Accessible

 Heightened accessibility is good for both inclusivity and for meeting ADA requirements. Transcripts allow those who are deaf or hard of hearing to get the information discussed during the call. You want everyone involved to be able to access this information so that they’re on the same page, but also to prevent ADA-related lawsuits, which have increased year-over-year for awhile now.

Keep in mind that offering transcripts and/or closed captions for video and audio is actually a requirement from the ADA to ensure equal accessibility.

How to Record Lifesize Meetings 

Recording Lifesize meetings is exceptionally simple.

Once your call has begun and participants have joined, you’ll see an icon with a small white circle along the bottom of the screen next to the options to invite new participants and turn your video or sound on or off. Click it to start recording. 

Once the meeting is over, you can click the “Stop recording” button. This will automatically save the call. 

You can find the video by heading to your navigational dashboard and finding “Recordings Feed” under “Recordings.” Here, you can select the specific conference that you want to review. 

Then, you can either download the file or get a link to share with whoever you’d like to view the recording. This only takes a few seconds.

How to Transcribe Lifesize Meeting Recordings with Rev 

Just as recording a video conference with Lifesize is simple, ordering transcripts of your Lifesize meetings with Rev is incredibly easy, too. Just follow these steps:

1. Go to the Rev.com Transcriptions page and click “Get Started”

2. Upload your video files to Rev

You can upload the files directly, share the URL to the recording, or pull the video from a Youtube or Vimeo account if your video is uploaded there. 

3. Choose to add timestamps to the transcript (if needed)

If you want to add closed captions to videos (which you may want to do, for example, if you want to publish a webinar recording and ensure that it’s accessible), choose the option that allows you to get timestamps on the transcript. This makes it easy to upload closed captions and subtitles with video editors, saving you an enormous amount of time.

4. Sit back with the transcription professionals do their job

Rev has over 50,000 professional transcriptionists who are available around the clock to tackle your projects. They’ll guarantee 99% accuracy or higher every time, and typically within 24 hours. 

You can also order professional closed captions from Rev, in the form of SRT files (the most popular caption file). This allows you to add closed captions to your meeting recordings with video editing software.

You can use the video editing software of your choice to add captions to your video recording. Simply open the video file, and then look for the option to add closed captions with the SRT file. You can see how to do this using Adobe Premiere Pro here.

Final Thoughts 

Lifesize is an exceptional tool, especially when you want to create a high-quality conference experience that reduces some of the almost-painful conference call cliches like “sorry, I can’t hear you” or “oh no, it looks a little glitchy.” This makes it a great choice for internal conference calls, client meetings, and even promotional events like webinars. 

Make sure that you’re taking full advantage of these calls and transcribe Lifesize recordings every time. Whether want to simply store the transcripts for your own records or upload closed captions to internal and external resources, this can save you a lot of time and make your life much easier.

Ready to get transcripts of your Lifesize video recordings? Get started transcribing now.

The event's speakers are:

No items found.