Home
How-to Guides
How to Permanently Add Subtitles to Videos

How to Permanently Add Subtitles to Videos

table of contents
Hungry For More?

Luckily for you, we deliver. Subscribe to our blog today.

Thank You for Subscribing!

A confirmation email is on it’s way to your inbox.

Share this post

Benefits of Permanent Subtitles

You have just seconds to catch your viewer’s attention. Attractive images and catchy tunes are vital for getting them to engage with you. But so are captions. Yes, captions or subtitles are essential. We know that much of social media is viewed sans sound, up to 85-percent, according to Facebook’s stats. 

Adding subtitles will help catch and keep viewers’ attention and boost your engagement rates. Another benefit of subtitles is to make sure that your content is as accessible as possible. 

Aside from the viewer experience, using open captions means that you don’t have to bother with SRT subtitle files or video editing software.

Closed Captions vs. Open Captions

When your video and audio have closed captions added to it, as a caption file like a .srt, the viewer can turn the captions off. This is convenient for them, but it’s a problem for you. Some social media platforms,  like TikTok, Instagram, and Snapchat do not support subtitle files, so you have the option of not captioning them or using open captions. 

With open or burned-in, captions, the text is hardcoded into the video file, so there’s nothing else to upload. There’s no extra work of uploading both video files and subtitle files. Additionally, the subtitles are always there, making your video accessible for all viewers.

A Step-By-Step Guide to Easily Add Subtitles to a Video

For those who don’t have an entire tech team at their disposal or plenty of free time to devote to learning a new skill, we’re here to help. With Rev.com, you can get accurate permanent subtitles in your video with minimal effort. If you’re creating more than one video a week, think of all the time you can free up by outsourcing this task!
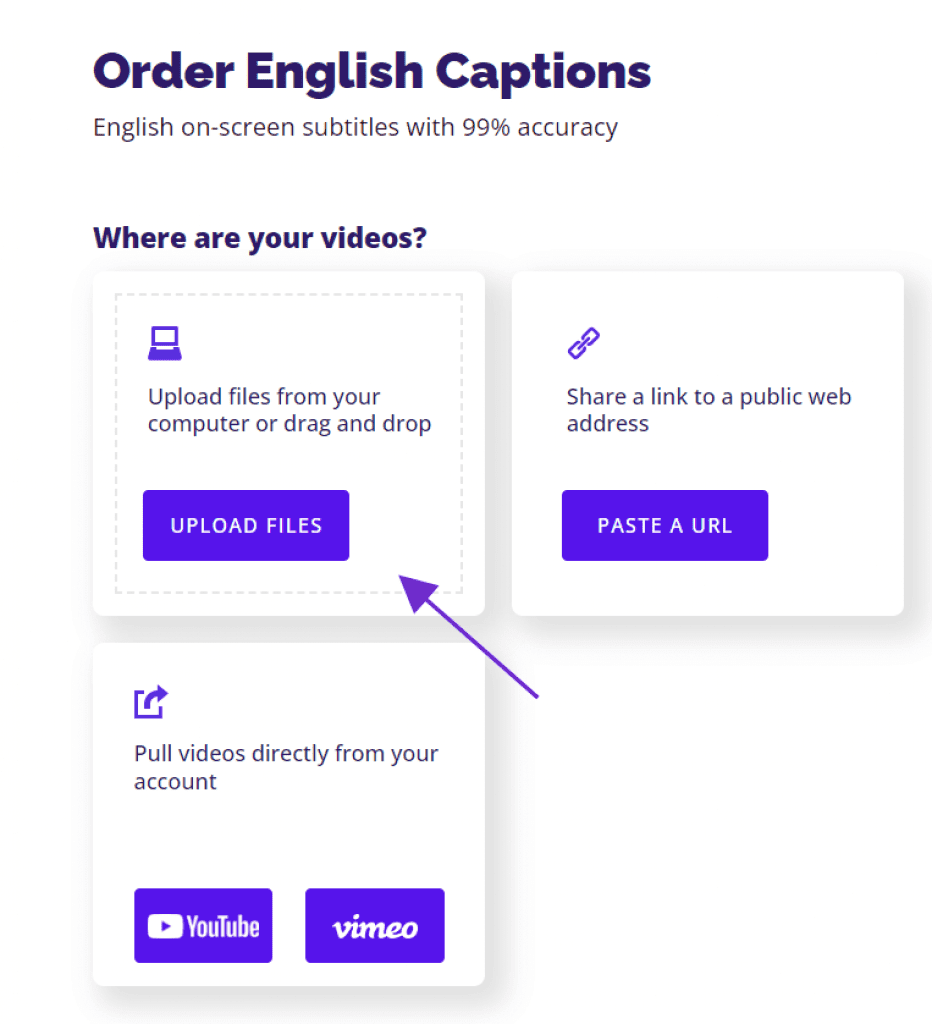
Order English Captions

1. Upload your video and order subtitles

After logging into your Rev account, it’s time to upload your video. This is a quick process and won’t take but a minute or two, depending on the size of the file, of course. 

2. Select “Burned-in Captions

Next up is the order page. This is where you’ll let our team of professional captioners know what to do. 

An essential step here is to tick the “burned-in captions” option. Since it’s an additional feature, we don’t presume that everyone wants it, so don’t forget to select it. 

Burned-in Caption pricing

On this page, you’ll also select the languages you want if you want translations done. 

Do take a minute to review your order before continuing to the payment page carefully. 

After processing the payment, a transcriptionist starts working on your order.

3. Review and customize the subtitles

Most orders are ready in less than 24 hours. You’ll get a notification when your video file is complete with a link to check it out. Take a look at the video and the captions to double-check them and make any edits if necessary. 

While you’re at it, you can also change the font and text size. We’ve chosen a standard one that works great for most people. But we know you may want it customized to fit your branding better or make your captions unique. 

4. Download your video

Once you’re satisfied with how the subtitles look on your video,  it’s time to download it. The download link in your email notification is valid for seven days. After that, you’ll need to log in to your account to access the file. Save the file to your computer or cloud for save keeping.

5. Post Your Video

Now you’re all set up to post to your social media accounts, post on YouTube, add to your website, etc.

Look at how easy that was! You can easily pass this task off to a virtual assistant to manage, or if you’re the VA handling video, use this to simplify your job. 

Add permanent subtitles to your video today to not only make your job easier but increase viewer engagement. 

How to permanently add subtitles to video

Using open captions, or permanent, subtitles is easy with the help of Rev’s skilled team of transcriptionists. Upload your video, select the services you want, and place your order. Upon completion, you’ll receive a link to download your video with permanent subtitles.

More Caption & Subtitle Guides

Subscribe to the Rev Blog

Lectus donec nisi placerat suscipit tellus pellentesque turpis amet.

Share this post

Subscribe to The Rev Blog

Sign up to get Rev content delivered straight to your inbox.

General

How to Permanently Add Subtitles to Videos

Benefits of Permanent Subtitles

You have just seconds to catch your viewer’s attention. Attractive images and catchy tunes are vital for getting them to engage with you. But so are captions. Yes, captions or subtitles are essential. We know that much of social media is viewed sans sound, up to 85-percent, according to Facebook’s stats. 

Adding subtitles will help catch and keep viewers’ attention and boost your engagement rates. Another benefit of subtitles is to make sure that your content is as accessible as possible. 

Aside from the viewer experience, using open captions means that you don’t have to bother with SRT subtitle files or video editing software.

Closed Captions vs. Open Captions

When your video and audio have closed captions added to it, as a caption file like a .srt, the viewer can turn the captions off. This is convenient for them, but it’s a problem for you. Some social media platforms,  like TikTok, Instagram, and Snapchat do not support subtitle files, so you have the option of not captioning them or using open captions. 

With open or burned-in, captions, the text is hardcoded into the video file, so there’s nothing else to upload. There’s no extra work of uploading both video files and subtitle files. Additionally, the subtitles are always there, making your video accessible for all viewers.

A Step-By-Step Guide to Easily Add Subtitles to a Video

For those who don’t have an entire tech team at their disposal or plenty of free time to devote to learning a new skill, we’re here to help. With Rev.com, you can get accurate permanent subtitles in your video with minimal effort. If you’re creating more than one video a week, think of all the time you can free up by outsourcing this task!

Order English Captions

1. Upload your video and order subtitles

After logging into your Rev account, it’s time to upload your video. This is a quick process and won’t take but a minute or two, depending on the size of the file, of course. 

2. Select “Burned-in Captions

Next up is the order page. This is where you’ll let our team of professional captioners know what to do. 

An essential step here is to tick the “burned-in captions” option. Since it’s an additional feature, we don’t presume that everyone wants it, so don’t forget to select it. 

Burned-in Caption pricing

On this page, you’ll also select the languages you want if you want translations done. 

Do take a minute to review your order before continuing to the payment page carefully. 

After processing the payment, a transcriptionist starts working on your order.

3. Review and customize the subtitles

Most orders are ready in less than 24 hours. You’ll get a notification when your video file is complete with a link to check it out. Take a look at the video and the captions to double-check them and make any edits if necessary. 

While you’re at it, you can also change the font and text size. We’ve chosen a standard one that works great for most people. But we know you may want it customized to fit your branding better or make your captions unique. 

4. Download your video

Once you’re satisfied with how the subtitles look on your video,  it’s time to download it. The download link in your email notification is valid for seven days. After that, you’ll need to log in to your account to access the file. Save the file to your computer or cloud for save keeping.

5. Post Your Video

Now you’re all set up to post to your social media accounts, post on YouTube, add to your website, etc.

Look at how easy that was! You can easily pass this task off to a virtual assistant to manage, or if you’re the VA handling video, use this to simplify your job. 

Add permanent subtitles to your video today to not only make your job easier but increase viewer engagement. 

How to permanently add subtitles to video

Using open captions, or permanent, subtitles is easy with the help of Rev’s skilled team of transcriptionists. Upload your video, select the services you want, and place your order. Upon completion, you’ll receive a link to download your video with permanent subtitles.

More Caption & Subtitle Guides

The event's speakers are:

No items found.